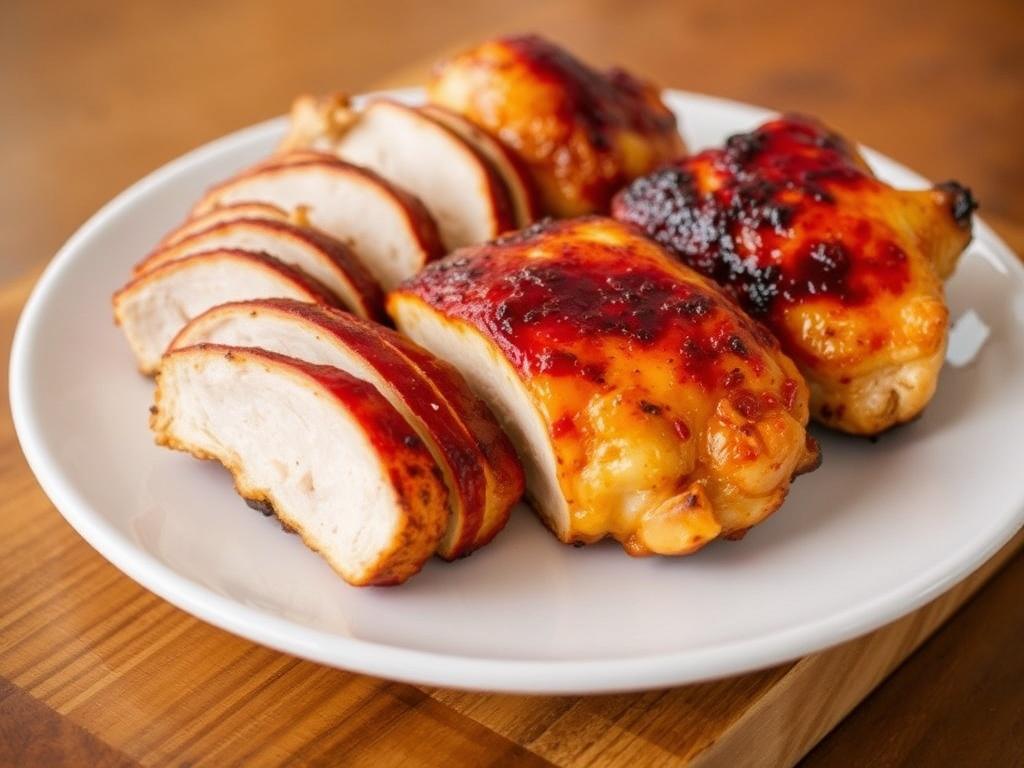
Archive: 3 September 2025

Warm, Tangy Comfort: The Art of Snickerdoodle Cookies

The moment a tray of snickerdoodle cookies comes out of the oven, the kitchen fills with a scent that belongs to childhood memories and cozy afternoons. These cinnamon-dusted rounds are deceptively simple: a soft, tender interior wrapped in a crackled shell of sugar and spice. They are not just another sweet; they ride a thin line between tart and buttery, with a texture that begs to be broken and shared. In this article I want to take you deeper than a recipe card — we’ll explore history, chemistry, techniques, and playful variations so you can make reliably excellent batches. Along the way I’ll share practical tips I’ve learned from years of baking and teaching friends and family how to handle delicate doughs.

Where Snickerdoodles Come From

The origins of snickerdoodles are delightfully murky, which is part of their charm. Many food historians trace them back to 19th-century New England or to German settlers who brought similar sugar-dusted cookies. The name itself sounds whimsically American and might come from an old German word or be a playful corruption, but the precise etymology remains debated. Regardless of provenance, the cookie became firmly rooted in American baking culture, appearing in community bake sales, holiday tins, and school lunchboxes. Over time the recipe evolved, with some versions favoring distinct tang from cream of tartar and others leaning into buttery richness.

What Sets a Snickerdoodle Apart

At first glance a snickerdoodle looks like a sugar cookie rolled in cinnamon-sugar, but it’s more than a surface treatment. The signature tang — a faint, pleasant acidity — often comes from cream of tartar combined with baking soda, which together influence both flavor and texture. That acidity also promotes the characteristic crinkled top as the dough spreads and the surface fractures. Texture-wise, a classic snickerdoodle tends toward soft and slightly chewy, with a delicate snap at the edges rather than being brittle. Finally, the cinnamon-sugar coating is applied generously, lending a warm spice that complements the underlying tang and butteriness.

Essential Ingredients and Their Roles

Understanding each ingredient helps predict how the dough will behave and how the final cookie will taste. Flour provides structure through gluten formation; too much and the cookie will be cakey or tough, too little and it will spread excessively. Fat — usually butter — contributes flavor, tenderness, and mouthfeel; its temperature and how it’s creamed with sugar also affect spread and lift. Sugars do double duty: granulated sugar aids in creating crisp edges and the cinnamon-sugar coating, while a touch of brown sugar can add moisture and caramel notes. Leavening, typically a balance of cream of tartar and baking soda, controls the rise, tang, and the crinkled surface that defines the cookie.

Liquid ingredients and eggs bind the dough and add richness, but their amounts must be precise: extra egg can yield a cakier cookie, while too little will make dough crumbly. Salt is subtle but essential; it brightens flavors and balances sweetness. For small changes — a slightly chewier texture, more pronounced cinnamon, less spread — adjusting these elements by tiny amounts makes a big difference. Knowing these roles turns recipes into tools you can tweak confidently, rather than strict rules you must follow blindly.

Classic Snickerdoodle Recipe: Ingredients Table

Below is a straightforward ingredient list for a classic batch that yields about three dozen cookies, depending on scoop size. Treat this table as a starting point; later sections explain how to adapt measurements for different textures or dietary needs. Precise measuring, especially of flour, makes the biggest single difference to consistent results.

Ingredient Amount Notes
All-purpose flour 2 3/4 cups (330 g) Spoon and level for accuracy
Granulated sugar 1 1/2 cups (300 g) Plus 1/4 cup for coating
Unsalted butter 1 cup (226 g), softened Room temperature, not melted
Eggs 2 large At room temperature
Cream of tartar 2 teaspoons Key to tang and texture
Baking soda 1 teaspoon Works with cream of tartar
Salt 1/2 teaspoon Enhances flavor
Cinnamon 2 teaspoons (for coating) Adjust to taste

Step-by-Step Classic Method

Begin by creaming the butter and sugar until the mixture is pale and slightly fluffy; this traps air that helps lift the cookie and improves texture. Add eggs one at a time, mixing between additions to keep the emulsion stable and the dough smooth. In a separate bowl whisk together flour, cream of tartar, baking soda, and salt, then fold the dry mix into the butter-egg base until just combined — overmixing will toughen the dough. Chill the dough for at least 30 minutes so it firms up; cold dough spreads less and often yields a taller, more tender cookie. Roll dough into uniform balls, then toss each in the cinnamon-sugar coating before placing on a lined baking sheet.

  1. Preheat oven to 375°F (190°C) and line baking sheets with parchment.
  2. Scoop 1.5-tablespoon dough balls and roll between palms for smooth rounds.
  3. Mix coating: 1/4 cup granulated sugar with 2 teaspoons ground cinnamon.
  4. Roll each ball in coating, then space 2 inches apart on sheet.
  5. Bake 8–10 minutes until edges are set and tops crack; cool slightly before transferring to a rack.

Watch closely in those final minutes: snickerdoodles can go from perfectly soft to overly brown quickly, especially near oven hotspots. Remove the cookies when the centers still look slightly underbaked; they’ll firm as they cool, preserving a tender interior. For neat crackled tops, don’t flatten balls before baking — let the dough rise and break naturally. If you prefer a crisper cookie, bake a minute or two longer but keep an eye to avoid browning the coating too much.

Texture and Temperature: Baking Physics in Practice

Temperature control and bake time dictate whether you get a soft, cakey cookie or a chewy, slightly crisp one. Higher oven heat encourages rapid expansion and set edges, which can preserve a soft center. Conversely, lower temperature with a longer bake produces more even drying and a sturdier chew. The state of your butter matters a great deal: room-temperature butter yields creamy dough and good spread, while cold butter will produce less spread and a denser crumb. Chilling the dough lets the flour hydrate and the fats firm up, giving you more predictable results, especially in warm kitchens.

Even the cream of tartar interacts with heat to produce that slightly tangy bite and helps stabilize the structure so that cookies form those pleasing cracks. Baking soda, reacting with acid, gives lift and coloration. Knowing these interactions lets you make intentional adjustments — for instance, reducing cream of tartar slightly if you prefer a milder tang, or lowering oven temperature a few degrees to extend bake time and intensify chew. Small calibrations, made consistently, are the hallmark of reliable baking.

Common Problems and How to Fix Them

Like any recipe, the snickerdoodle has a set of typical pitfalls, but each has a straightforward remedy. If cookies spread too thin and become crisp, reduce butter slightly, chill the dough longer, or add a tablespoon or two of extra flour. If they’re flat but still pale, verify your baking soda and cream of tartar are fresh; old leaveners lose power and yield limp results. Overly dry, cakey cookies usually come from too much flour or overbaking; use the spoon-and-level method for flour and watch the oven closely in the final minutes.

  • Excess spread: chill dough, reduce butter, use higher oven temp briefly.
  • No cracks on top: ensure cream of tartar is included and bake at correct temp.
  • Brittle texture: bake slightly less time and check flour measurement.
  • Uneven browning: rotate pans halfway through baking and use light-colored baking sheets.

When diagnosing problems, change one variable at a time so you can identify the cause. Keep a small baking notebook with notes on oven quirks and ingredient brands; it’s astonishing how much difference a particular oven rack or flour type can make. Over time you’ll develop a sense for how your kitchen wants its cookies baked, which makes troubleshooting unnecessary more often than not.

Variations to Expand the Snickerdoodle Family

Once you’ve mastered the classic, variations are a playground. Browned butter adds depth: cook the butter until nutty aromas emerge, cool slightly, then proceed with the recipe for toasted, caramel notes. For a chewier result, swap one tablespoon of butter for an equal measure of light corn syrup or add a tablespoon of molasses. To introduce texture, fold in toasted pecans or white chocolate chips, rolling the balls carefully so inclusions won’t disrupt the crackled top. Each tweak changes the cookie’s personality, from rustic and nutty to lush and chocolatey.

Dietary swaps can keep these treats accessible. Replace butter with a vegan margarine designed for baking and use a flax-egg to bind; reduce bake time slightly and expect a softer texture. For gluten-free versions, use a well-formulated 1:1 gluten-free flour blend and add a teaspoon of xanthan gum if the blend lacks it, which helps mimic gluten’s structure. These substitutions work best when you accept small differences in texture and flavor, focusing on enjoying the essence of the snickerdoodle rather than exact replication.

Glazing, Filling, and Fancy Finishes

Snickerdoodles can wear many hats beyond simple sugar snaps. A thin glaze of lemon or vanilla adds visual shine and a flavor lift — brush it on after cooling for a glossy finish. Sandwich two cookies with a cinnamon buttercream or cream cheese filling for an indulgent treat that balances tang, spice, and sweetness. For holiday presentation, dip half of each cookie in melted dark chocolate and sprinkle with toasted cinnamon sugar or crushed nuts while the chocolate is still tacky. These finishing touches transform a humble cookie into a centerpiece for gatherings without complicating the bake itself.

Keep proportions modest when glazing or filling: you want complements, not competitors. A heavy coating can mask the delicate tang that defines the cookie. Also, be mindful of texture contrasts; a soft filling paired with a too-brittle cookie will create a mismatch. Aim for balance so each bite offers spice, tang, and either a gentle chew or a clean snap, depending on your preference.

Storage, Freezing, and Make-Ahead Tips

Snickerdoodles are forgiving when it comes to storage, which makes them great for planning ahead. At room temperature, keep cookies in an airtight container separated by parchment; they’ll stay fresh for about 4–5 days. If you prefer a chewier texture, add a slice of bread to the container — the cookies will absorb moisture from the bread and soften slightly overnight. For longer storage, freeze baked cookies in a single layer on a tray, then transfer to a freezer bag; they’ll keep for up to three months and thaw within an hour at room temperature.

Dough also freezes well and is a baker’s secret weapon. Roll dough into coated balls, flash-freeze on a tray for an hour, then bag them for future bakes. Bake from frozen by adding a minute or two to the bake time; this method delivers warm, freshly baked cookies on demand without compromising texture. Label bags with date and bake time so you always know how to retrieve a perfect batch later.

Pairings and Serving Suggestions

Snickerdoodle Cookies. Pairings and Serving Suggestions

These cookies pair with simple beverages and bolder accompaniments alike. A classic combination is a glass of cold milk, which softens the cinnamon and balances sweetness. For adults, coffee or a cinnamon-spiced latte complements the cookie’s spice, while black tea highlights its subtle tang. On a dessert platter, offer snickerdoodles alongside slightly tangy fruit preserves or a small bowl of whipped mascarpone for spreading; the creamy contrast elevates the experience. Presentation matters: warm cookies served on a wooden board with a scattering of cinnamon-sugar look inviting and effortless.

Baking with Children and Group Baking Tips

Snickerdoodles are wonderfully suited to baking with kids: the rolling, coating, and watching the crackle as cookies bake are tactile pleasures that engage attention. Assign simple tasks like mixing the coating or dropping dough onto baking sheets, and use the opportunity to teach measuring basics and kitchen safety. Keep stations organized so little hands aren’t overwhelmed — pre-measured bowls and a clear sequence of steps make participation enjoyable and productive. Expect flour on the countertops; part of the memory is the mess, and it’s worth it for the smiles and sense of accomplishment.

When baking with groups, prepare multiple sheets and rotate trays so each baker can watch a sheet bake. If you’re teaching a class, demonstrate dough texture expectations physically — showing rather than describing helps novices know when the dough is right. Encourage experimentation within safe boundaries: a dash more cinnamon in the coating or slightly larger scoops for fewer, thicker cookies can be fun experiments that teach cause and effect in the kitchen.

Nutrition Notes and Allergy-Friendly Adjustments

Traditional snickerdoodles are simple but not light on calories, as they rely on butter and sugar for flavor and texture. For those monitoring intake, you can reduce sugar by 15–20% without dramatic changes to structure, though the coating will be less pronounced. Using part whole-wheat pastry flour can add fiber and a gentle nutty note, but don’t replace more than 25–30% or cookies risk becoming dense. For dairy allergies, use a plant-based stick butter formulated for baking; these often mimic butter’s water-fat balance better than tub margarines.

Egg allergies can be addressed with commercial egg replacers or a flax-egg (1 tablespoon ground flaxseed + 3 tablespoons water per egg), though results vary: flax tends to yield slightly denser cookies. Always test adjustments on a small batch first and label any shared treats clearly to protect guests with severe allergies. The goal is to maintain the distinctive tang and spice while accommodating dietary needs thoughtfully.

Commercial vs. Homemade: Why Bake Your Own

Store-bought cookies have their place for convenience, but homemade snickerdoodles offer control and freshness that packaged versions rarely match. When you bake at home you can adjust sugar, spice intensity, fat type, and salt levels to match personal taste. Freshly baked cookies also have that ephemeral appeal: warm from the oven, soft centers, and the precise crackle of a well-formed top cannot be replicated from a plastic tray. Additionally, the act of baking itself — the rhythm of measuring, creaming, and rolling — is a creative and calming ritual that enhances the enjoyment of eating the final product.

Scientific Side: Why Cream of Tartar Matters

Cream of tartar plays a subtle but vital role in many snickerdoodle recipes by contributing both to chemical leavening and flavor. As an acid, it reacts with baking soda to produce carbon dioxide, which helps the cookie rise and form its characteristic crinkled surface. Beyond leavening, cream of tartar stabilizes the dough’s structure and imparts a faint tang that differentiates these cookies from plain sugar cookies. While some bakers omit it or substitute lemon juice, cream of tartar gives the most consistent, authentic result because it’s a dry acid that integrates evenly into dry mixes without adding extra moisture.

Understanding this chemistry lets you make informed choices: if you remove cream of tartar, you’ll need an alternate acid and possibly adjustments to leavening to preserve texture and flavor. The measurable effect may be small in a single cookie, but across a batch it’s what shifts a good cookie into something recognizably a snickerdoodle rather than merely a cinnamon sugar cookie.

Final Baking Rituals and Presentation

Small rituals elevate both the baking process and the final serving. I like to toast a pinch of cinnamon briefly in a dry skillet before mixing it into the coating; the aroma blooms and the flavor deepens. Let cookies cool a few minutes on the sheet before transferring to a rack so they set without breaking. For gifting, stack cooled cookies separated by circles of parchment and wrap with twine, adding a handwritten note about when they were baked. These little touches make the act of sharing more intentional and memorable.

Ultimately, mastering the snickerdoodle is about tuning into texture, tempering expectations, and enjoying the playful experimentation that baking invites. Each oven and baker will produce slightly different results, and that variety is part of what makes home baking so satisfying. Carry these techniques and tips into your kitchen, and you’ll find that consistently delicious cookies are less a mystery and more a fun, repeatable craft.

Make a batch, take that first warm bite, and notice the balance of tartness, spice, and butter — then start thinking about your next small experiment. Whether you stick to the classic or branch into browned-butter or gluten-free variations, snickerdoodles remain a welcoming canvas for flavor and technique. Happy baking.
Silky Green Indulgence: How to Make the Best Avocado Chocolate Mousse

This is a little rebellion against the idea that indulgence must come with a side of guilt. A creamy avocado and deep chocolate come together in a dessert that feels decadent but is refreshingly simple to make. Whether you want something vegan, quick, or just a way to hide greens in plain sight, this recipe fits the bill. I’ll walk you through ingredient choices, technique, troubleshooting and a handful of creative variations so the result is reliably smooth and richly chocolatey. Expect practical tips, a few personal anecdotes, and actionable steps rather than vague claims.

Why avocado is an unlikely but brilliant base

At first, avocado seems like a savory ingredient, so using it in a sweet recipe surprises many people. The secret is its texture: ripe avocado offers an almost custard-like body that whips into satin with minimal effort, providing the fat and mouthfeel traditional mousse gets from cream or eggs. Its mild flavor makes it an excellent canvas for chocolate, allowing cocoa and sweeteners to shine while contributing healthy monounsaturated fats and a subtle, buttery finish. If you’re worried about green-tinted dessert, dark chocolate and cocoa powder will neutralize color and deliver the familiar chocolate intensity most people expect. Finally, avocado makes the mousse flexible for dietary needs — it’s easy to make vegan, dairy-free, or lower in refined sugar without sacrificing creaminess.

Choosing ingredients: quality matters

Start with ripe avocados that yield slightly when pressed but are not mushy; underripe fruit creates grainy texture while overripe ones can taste off. Pick chocolate with at least 60% cacao for a rounded, less sweet profile and use unsweetened cocoa powder when you want that intense chocolate backbone. For sweeteners, raw honey, maple syrup, agave or simple powdered sugar all work; each brings different nuances, so taste as you go. If you add dairy, use full-fat cream or mascarpone for silkiness, but a neutral plant-based milk or coconut cream can be excellent substitutes for vegan versions. A pinch of sea salt and a splash of vanilla extract or espresso boosts depth and rounds out the chocolate’s bitterness without adding extra sweetness.

Ingredient table: purpose and substitutions

Ingredient Purpose Common Substitutes
Ripe avocado Provides fat, texture and body Not applicable — use ripe fruit only
Dark chocolate or cocoa Primary chocolate flavor and color Cocoa + coconut oil if avoiding melted chocolate
Sweetener Balances bitterness and enhances mouthfeel Maple syrup, honey, agave, powdered sugar
Vanilla, salt Flavor enhancers Espresso, orange zest, cinnamon
Cream or plant milk Smoothness, optional richness Coconut cream, oat milk, almond milk

Essential equipment and technique

You don’t need fancy tools to make a flawless mousse, but a few pieces of equipment will make the process predictable and quick. A high-speed blender or food processor gives the creamiest results by fully puréeing avocado flesh into a silk-like emulsion, and an immersion blender is another useful alternative for small batches. If you plan to melt chocolate, use a heatproof bowl over simmering water or a microwave in short bursts, stirring often to avoid burning. For folding in whipped cream or aquafaba (for aeration), use a rubber spatula and gentle motion so you keep as much air as possible in the final mixture. Chilling is non-negotiable: the mousse firms and flavors meld after at least an hour in the fridge, so plan for that pause between prep and presentation.

Step-by-step recipe: classic creamy version

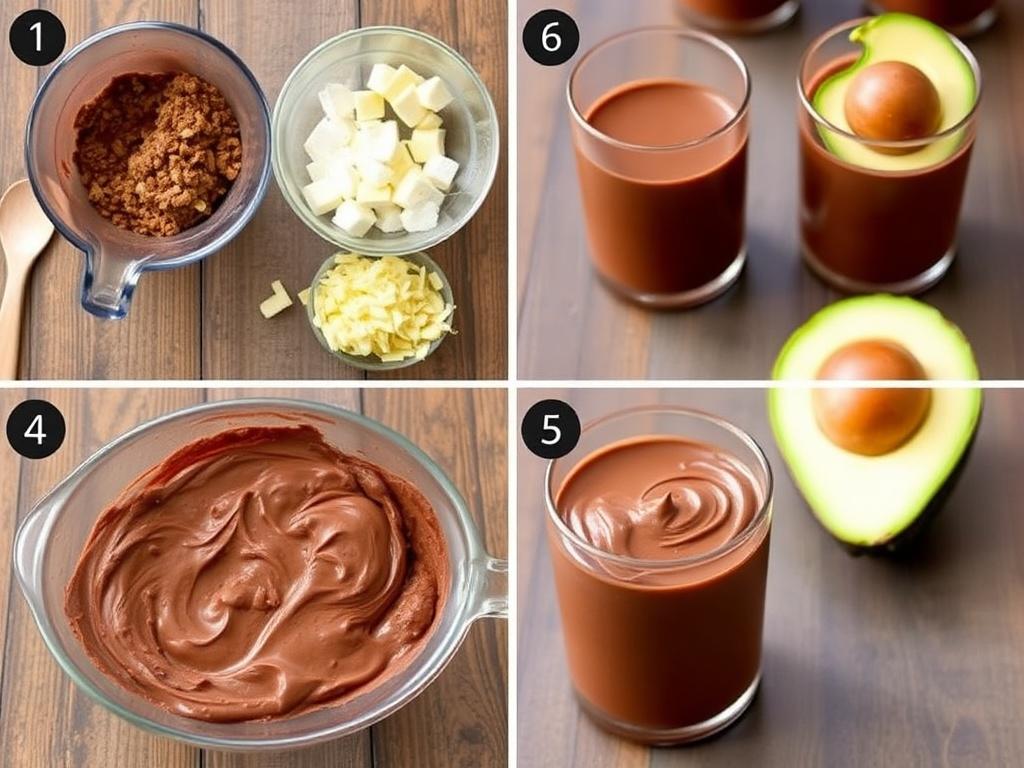
Avocado Chocolate Mousse. Step-by-step recipe: classic creamy version

This set of instructions gives you a dependable base for the mousse; feel free to tweak the sweetener or chocolate percentage to match your taste. The amounts below serve about four to six small portions and scale up easily for a crowd without changing the technique. Read through the steps before you start, have everything measured and use room-temperature avocados for the smoothest texture. If you plan to add whipped cream, chill the mixing bowl and whisk in advance so the cream reaches proper volume quickly. Follow the steps, taste and adjust before chilling; tiny tweaks at this stage are far easier than trying to fix a set dessert.

  1. Prepare ingredients: halve and pit two large ripe avocados, measure 100–140 g of dark chocolate (60–75% cacao), 1/4 cup unsweetened cocoa powder, 3–4 tablespoons maple syrup or equivalent sweetener, a pinch of kosher salt, 1 teaspoon vanilla extract, and 2–4 tablespoons of neutral liquid (milk or plant milk) to loosen texture if needed.
  2. Melt chocolate gently: chop chocolate finely and melt either over a bain-marie or in 20–30 second bursts in the microwave, stirring between bursts until smooth. Allow the melted chocolate to cool slightly but not harden; pouring hot chocolate over avocado will cook it and alter texture.
  3. Blend base: scoop avocado flesh into the food processor, add cocoa powder, maple syrup, salt and vanilla. Process until very smooth, stopping to scrape down the sides so no green flecks remain. Add the cooled melted chocolate and pulse until fully combined and silky.
  4. Adjust texture and sweetness: if the mixture is too thick, add the neutral liquid tablespoon by tablespoon until the spoon falls through the puree like thick ganache. Taste for sweetness and bitterness; add more syrup or a small pinch of salt as needed. For an aerated mousse, whip 1/2 cup heavy cream to soft peaks and fold a third at a time into the chocolate-avocado base with a spatula.
  5. Chill and serve: spoon into glasses or ramekins, cover and refrigerate for at least one hour to firm. Garnish with flaky sea salt, shaved chocolate, toasted nuts or fresh berries just before serving for contrast in texture and flavor.

Variations to suit diet and mood

Once you have the base down, variations are simply about swapping one element while keeping technique intact. For a vegan aerated mousse, replace whipped cream with aquafaba whipped to soft peaks and fold it gently into the chocolate-avocado mixture. If you favor a richer, more indulgent mouthfeel, fold in softly whipped coconut cream; the coconut will knead into the chocolate notes and elevate the dessert. To reduce sugar and keep the flavor bright, use a combination of erythritol and a touch of stevia, and boost depth with a teaspoon of instant espresso dissolved in a bit of warm water. For a citrus twist, stir in a teaspoon of orange zest and a half teaspoon of Grand Marnier or orange extract for a classic pairing with dark chocolate.

Simple list of creative add-ins

  • Sea salt flakes and roasted hazelnuts for contrast.
  • Chili powder or cayenne for a subtle heat that enhances chocolate.
  • Mint extract or fresh basil for a herbaceous lift.
  • Peanut butter swirl or almond butter for nutty richness.
  • Protein powder for a post-workout treat with chocolate and healthy fats.

Troubleshooting: common problems and fixes

If the mousse turns out too runny, the cause is usually under-ripe avocado or too much liquid. Remedy this by blending in a small additional avocado or chilling the mixture to let it set; you can also fold in a bit of melted but cooled chocolate to firm the structure without changing flavor. Graininess often stems from under-processed avocado or cocoa that wasn’t well blended; process longer and scrape down the bowl frequently until the texture is uniform. Overly sweet results are easy to correct with a pinch of coarse salt and a squeeze of lemon or a teaspoon of espresso — both tame sweetness and deepen chocolate. If the mousse is too bitter, a bit more sweetener or a tablespoon of coconut cream will balance the flavor without masking the chocolate.

Presentation and pairing ideas

Presentation elevates a simple dessert into something memorable; think about contrasts in texture, color and temperature. Top the mousse with crunchy elements such as toasted nuts, cacao nibs or a crisp tuile to complement the smooth body. Fresh fruit — berries, thinly sliced pear or orange segments — introduces acidity and brightness, cutting through the richness in a satisfying way. For drinks, pair the mousse with a robust red wine like a young Tempranillo or a fortified demi-sec Port, or go non-alcoholic with intensely brewed espresso or a floral tea. Serve portions modestly; this dessert feels decadent even in small amounts, and finishing with a light accompaniment preserves balance on the palate.

Nutrition and health considerations

This dessert manages to feel indulgent while offering nutritional upsides not typical for mousse. Avocado brings heart-healthy monounsaturated fats, fiber and potassium, and dark chocolate supplies antioxidants and magnesium when you choose higher-cacao content. Replacing cream and eggs makes the recipe accessible to vegan diets and reduces saturated fat when dairy is omitted. Caloric content will vary by sweetener and serving size, so portion control matters if you’re tracking intake; one modest serving can be a satisfying treat without derailing a balanced day. Finally, using whole-food sweeteners like maple or honey adds flavor complexity along with antioxidants that refined sugars lack, which is a small but meaningful upgrade.

Make-ahead, storage and freezing

Mousse made from avocado keeps well in the refrigerator for up to three days when sealed, and chilling actually improves texture as the fat re-solidifies slightly. To prevent surface discoloration or oxidation, press a piece of plastic wrap directly onto the top of the mousse or use airtight containers; a dusting of cocoa powder also acts as a light barrier. Freezing is possible but not ideal for texture — thawed mousse can separate or become watery, though rousing it in a blender can restore some creaminess. If you must freeze, portion into small airtight containers and consume within a month; thaw slowly in the fridge and re-emulsify briefly before serving. For parties, prepare the base a day ahead and fold in whipped components or fresh garnishes just before serving to preserve aeration and crunch.

Personal notes from the kitchen

I remember the first time I made this for friends who were skeptical — they expected a health-food gimmick but left asking for the recipe. I had swapped maple syrup for sugar in a family dinner experiment and watched even dessert-averse relatives reach for second helpings. On another occasion, I served a chilled version with chili and sea salt to a small dinner party, and the contrast of heat and smooth chocolate became the evening’s highlight. Those experiences taught me that texture and balance win over explanations; when the mousse is smooth and the chocolate right, people don’t care what’s inside. That practical lesson shapes how I approach flavor adjustments now: taste early, correct gently, and let the ingredients speak for themselves.

Bringing it to the table

This recipe is less about following rules and more about arriving at a satisfying result: a dessert that feels luxurious without being fussy. Keep an eye on the ripeness of your avocados and the intensity of your chocolate, choose your sweetener to match the occasion, and use chilling time as an ally rather than an inconvenience. Small finishing touches — a sprinkle of salt, a shard of tempered chocolate, a few fresh raspberries — transform the dish visually and tastefully, turning a simple bowl into an event. Try a few variations to see what resonates with your guests and your weeknight routine; once you master the base, adapting it becomes a joy rather than a chore.

Comfort in a Bowl: The Art and Soul of Mac and Cheese

There is a kind of domestic magic in a simmering pot of melted cheese clinging to tender pasta, the steam carrying the promise of something warm and uncomplicated. This dish lives at the intersection of memory and technique, beloved for its forgiving nature and endless possibilities. Whether you reach for a box, stir up a velvety sauce on the stovetop, or bake a golden, crunchy casserole for a weekend crowd, the core idea is simple: good pasta plus good cheese equals comfort. In the pages that follow I will walk you through history, technique, variations, and real-life tips that make this classic sing at the table.

Where It Began: A Brief History

Mac and Cheese. Where It Began: A Brief History

The roots of the dish go back much farther than the neon packets on supermarket shelves. Early recipes combining pasta and cheese appear in medieval Europe, and by the 18th century, cookbooks in England included baked preparations of macaroni with Parmesan. The concept crossed the Atlantic and evolved in North America, shaped by accessibility and local cheeses. In the United States the dish became a home-cooking staple and later a processed-food icon, yet the homemade versions that emphasize fresh dairy and technique keep drawing people back.

Historical variations reveal how versatile the formula is. In southern U.S. kitchens, casseroles with sharp Cheddar and milk have long been a celebration food, while in France and Italy similar combinations took different forms with béchamel and aged hard cheeses. Observing these paths helps explain why modern cooks feel free to modify textures, cheese blends, and add-ins without betraying the spirit of the dish. Understanding that lineage makes every experiment feel like part of a conversation with cooks who came before us.

Anatomy of Greatness

At its most honest, the dish has three components: the pasta, the binding sauce, and the cheese — plus an optional contrasting topping. Each must be considered. The pasta provides structure and mouthfeel, the sauce brings silkiness and flavor delivery, and the cheese contributes richness, aroma, and the all-important stretch. Neglect one element and the whole can fall flat; make them work together and you get texture, balance, and that irresistible pull of molten strands.

Beyond those three parts, technique is what separates the average from the exceptional. Salt the pasta water well, be patient while making a smooth sauce, and think about temperature management when combining cheese and liquids so the result is velvety, not grainy. Little choices matter — the amount of residual pasta water, the heat when you add the cheese, whether you finish with a splash of acid or a dusting of a hard cheese — and these decisions are what I’ll unpack for everyday cooks.

The Pasta: Shapes, Sizes, and Why They Matter

Pasta carries the flavor and determines how each bite behaves. Traditional elbow macaroni works because its hollow curve and surface area trap sauce, but shells, cavatappi, orecchiette, and small rigatoni all have their devotees. When choosing pasta, prioritize shapes that hold sauce; smooth tubes release more sauce, while ridged varieties cling to it. Small shapes are especially good for casseroles where you want sauce and pasta to bind into cohesive scoops.

Cooking time is another consideration. Aim for just shy of al dente if you plan to bake, giving the pasta room to finish cooking in the oven without collapsing. For stovetop versions, bleed off a minute so the final bite keeps some tooth. I always reserve a cup of the starchy cooking liquid before draining; that liquid is a secret ally when adjusting the consistency of the sauce and helps the cheese meld without seizing.

The Cheese: Choices and Combinations

Cheese selection is both the most delightful and most technical part of the process. Melting behaviour, flavor intensity, and moisture content vary widely between cheeses. A good formula blends a base-melting cheese, such as young Cheddar or fontina, with a more flavorful partner like aged Gruyère or sharp Cheddar. That way the sauce gains both creaminess and depth. Avoid relying on very hard grating cheeses as the primary melting component because they can lead to grainy textures if used alone.

Salt and acidity in cheese also influence the overall profile. A tangy cheese brightens the dish and cuts richness, while a starchy, neutral melting cheese builds that silky mouthfeel. Mixing cheeses gives you control: use a smooth melter for elasticity, a savory aged cheese for character, and a finishing dusting of a flavor punch. Keep a small tasting stash of cheeses at home; I often experiment with three-cheese blends and find that modest adjustments elevate the final result dramatically.

Cheese Melting Quality Flavor Profile
Young Cheddar Excellent Buttery, mild
Aged Cheddar Good Sharp, savory
Gruyère Very Good Nutty, complex
Fontina Excellent Milky, mild
Parmesan (Parmigiano) Moderate Umami, salty

The Sauce: Béchamel, Velouté, and Shortcut Methods

A classic béchamel provides the most reliable base: a roux of flour and butter whisked with milk until silky. This method controls thickness and creates a smooth body for melted cheese to suspend in. Heat gently, add cheese off the heat, and stir until incorporated. If you heat too high while adding cheese, proteins can separate and the sauce turns grainy. Patience and moderate temperature are your allies.

Not everyone wants to fuss with a roux, and shortcuts exist that still yield pleasing results. Slow-whisked evaporated milk can give a creamy body with minimal steps, while shredded cheese melted with a little cream and a few spoonfuls of starchy pasta water can make a quick, luscious sauce. For weeknight simplicity, choose the method that fits your rhythm and then follow a couple of technical rules: control heat, add cheese gradually, and stabilize with a little starch if needed.

Texture and Topping: The Crunch Factor

Contrasting textures are what make the dish interesting beyond its inherent creaminess. A crisp breadcrumb topping browned with butter, panko toasted in oil, or crumbled potato chips pressed into the surface provide a satisfying counterpoint. For baked versions, that top layer also signals when the casserole is done: bubbling edges and a bronzed crown are your cue. Do not underestimate the psychological pleasure of a little crackle amid soft, cheesy pasta.

Toppings can also add flavor. A sprinkle of smoked paprika, a scattering of fresh herbs, or a shower of grated hard cheese enhances aroma and complexity. If you prefer a more rustic finish, stir in diced bacon or caramelized onions under the breadcrumbs so each spoonful offers both cream and chew. I sometimes toast the breadcrumbs with garlic and thyme for a savory lift that keeps the dish from feeling one-note.

Regional and Creative Variations

The basic formula invites endless reinterpretation. In the American South, creamy baked casseroles frequently include eggs and evaporated milk to set the interior, creating a firmer, sliceable dish that pairs well with barbecue or collard greens. In the Caribbean, cooks might add Scotch bonnet peppers or grated coconut, making a brighter, more aromatic dish. Up north and in New England, lobster or crab can get tossed in for decadent seafood versions served at dinner parties.

Modern chefs push the concept further, introducing ingredients like truffle oil, roasted squash, or kimchi to contrast the cheese. There are also playful approaches: fried mac and cheese balls for finger food, mac and cheese pizza, or layered bakes that mix in greens and roasted vegetables. Experimentation is part of the joy; every addition should balance texture and flavor rather than overshadow the dairy centerpiece.

For family-friendly lunches, a smaller portion of stovetop mac transforms easily into a packed meal the next day. Add-ins like steamed broccoli florets, diced ham, or peas keep it substantial without complicating the preparation. I often double a stovetop batch for weekday lunches, reheating gently with a splash of milk to restore sauciness, and that small planning step saves time while keeping the comfort factor intact.

Weeknight Strategies and Make-Ahead Tricks

On busy evenings, speed matters. A reliable weeknight approach starts with quick-cooking pasta and a simple sauce: melt cheese into warmed milk and a spoonful of softened butter, using reserved pasta water to adjust texture. Keep the heat low and stir until silk forms. This gives you dinner in under 20 minutes and keeps cleanup minimal, which is essential on nights when the day has already gone long.

For make-ahead dinners, assemble the casserole up to the point of baking, cover, and refrigerate for up to 24 hours. Bring the dish to room temperature before baking and add a few extra minutes to account for the chilled interior. Freezing works well too: freeze the unbaked casserole tightly wrapped, then thaw overnight in the refrigerator before baking. In all cases, give the dish a tip of fresh grated hard cheese just before serving for a bright, savory finish.

Lunch planning benefits from simple changes. Portion leftovers into microwave-safe containers and include a small cup of milk or cream to stir in when reheating. That keeps the pasta from drying while preserving the creamy texture. For take-to-work meals, I like to add a scattering of fresh herbs and a little lemon zest after reheating to lift the flavor profile and make the midday meal feel less heavy.

Nutrition, Swaps, and Lighter Approaches

The classic dish is indulgent, but small swaps can make it lighter without losing comfort. Use lower-fat dairy options, blend in unsweetened Greek yogurt for creaminess with extra protein, or mix cauliflower puree into the sauce to cut back on starch. Whole-grain pasta or legume-based shapes add fiber and a bit more structure, and portion control helps the dish fit into a balanced meal plan. Keep flavors bold so a smaller serving feels satisfying.

Vegan and dairy-free versions have also come a long way. Nutritional yeast provides umami and cheesiness while blended cashews, silken tofu, and plant-based milk create a creamy body. Tapioca or arrowroot starch can lend elasticity and stretch that mimic melted dairy. For those avoiding gluten, brown rice or chickpea pasta works well; cook it to just past al dente and combine with a robust sauce so the final texture remains pleasing.

When considering swaps, taste isn’t the only factor; think about melting behavior and moisture. A vegan cheese that tastes great cold might fail to melt properly, producing a grainy or oily texture. Test combinations: pair creamy cashew bechamel with a small amount of a melting plant-based cheese, and finish with a sprinkle of toasted nutritional yeast for savory depth. These practical experiments will remove much of the uncertainty.

Pairings and Serving Suggestions

This dish pairs surprisingly well with bright, acidic components that cut through fat. A crisp green salad tossed in a tart vinaigrette, pickled vegetables, or a simple slaw gives contrast. For heartier meals, roast chicken, grilled sausages, or smoky pork create satisfying protein matches. Wine pairing follows the same logic: choose wines with enough acidity to refresh the palate, such as a dry Riesling or a unoaked Chardonnay.

For casual gatherings, serve mac with a vegetable-forward side and a platter of crunchy pickles or olives. That allows guests to balance spoonfuls of cheese-laden pasta with bites that reconcile richness. When presenting to children, chunkier add-ins can be served on the side so each diner builds their own plate. The flexibility here is an advantage; you can frame the dish as main, side, or part of a buffet depending on company and occasion.

Troubleshooting Common Problems

Even experienced cooks run into issues: a grainy sauce, a split texture, or a watery casserole. Graininess often stems from overheating the cheese or using dry, aged cheeses as the primary melting agent. Fix this by whisking in a splash of hot milk off the heat to smooth things out, or puree briefly with an immersion blender to reincorporate fats. Temperature control when adding cheese is the simplest preventative measure.

Watery pasta surfaces when sauce and pasta ratios are off or when the bake time is too short. If your casserole seems too loose straight out of the oven, give it a few minutes to rest — the sauce will thicken as it cools. For stovetop versions, hold back a small amount of starchy pasta water to adjust consistency; a tablespoon at a time lets you find the perfect texture without overshooting. Small tweaks during cooking solve most of the common mishaps.

Two Recipes to Try Tonight

Classic Stovetop Version

Ingredients: 300 g short pasta, 3 tablespoons butter, 3 tablespoons flour, 500 ml milk, 150 g sharp Cheddar shredded, 100 g young Cheddar shredded, salt and black pepper, pinch of nutmeg (optional). Cook the pasta until just shy of al dente and reserve 100 ml pasta water. In a saucepan melt butter over moderate heat, whisk in flour to make a roux and cook for a minute without browning. Gradually whisk in warmed milk until smooth and thickened, then remove from heat and stir in cheeses a little at a time until silky. Fold in the drained pasta and a splash of pasta water if needed; season to taste and serve immediately.

Baked Casserole with Crunchy Topping

Ingredients: 400 g pasta, 50 g butter plus 2 tablespoons, 50 g all-purpose flour, 700 ml milk, 200 g sharp Cheddar shredded, 100 g Gruyère shredded, 50 g Parmesan grated, 1 cup breadcrumbs, salt and pepper. Preheat oven to 190°C. Cook pasta until just under al dente and drain. Make a béchamel by melting 50 g butter, stirring in flour, and whisking in milk until thick. Remove from heat and stir in Cheddar and Gruyère until smooth; combine with pasta and transfer to a buttered baking dish. Mix breadcrumbs with 2 tablespoons melted butter and Parmesan, sprinkle over the top, and bake until bubbling and golden, about 20–25 minutes. Rest five minutes before serving.

Personal Notes and Practical Habits

Over the years I’ve learned to treat this dish like a living recipe that adapts to seasons and pantry contents. I keep small blocks of different cheeses wrapped in the fridge, label them with purchase dates, and grate as needed rather than using pre-shredded blends that contain anti-caking agents. On a simple level this makes a noticeable difference in texture and flavor. Cooking for guests, I often prepare the béchamel earlier in the day and gently reheat it, then add freshly grated cheese at the last minute so the sauce stays glossy.

Another habit: taste as you go. Cheese chemistry and milk fat vary from batch to batch, and a quick adjustment with salt, a squeeze of lemon, or a dash of hot sauce can fix what the palate perceives as flat. For lunches I portion into smaller containers with a little extra sauce on the side, which preserves the final texture when reheating. These small routines save time and keep the experience consistent whether you’re cooking for family or company.

Final Thoughts

What keeps people returning to this dish is its adaptability and the satisfying comfort it delivers with minimal fuss. Understanding the interplay between pasta, sauce, and cheese allows you to shape the result toward whatever mood or meal you envision. From quick weeknight bowls to festive baked casseroles, the techniques outlined here will help you build reliability and confidence in the kitchen. A pot of warm, cheesy pasta can be both humble and elegant, and once you master the basics, you can take it anywhere your taste buds want to go.

Food is a conversation across kitchens, and every version of this classic carries a bit of its maker. Try one of the recipes, make small changes, and notice how texture and seasoning respond. In my experience, the most memorable meals come from modest adjustments that respect the dish’s essence: tender pasta, a luscious sauce, and a carefully chosen cheese. Treat it with that kind of attention and it will repay you with deep, familiar satisfaction at the table.

Warm Swirls: The Art and Joy of Making Cinnamon Rolls at Home

I still remember the first time I pulled a tray of warm swirls from the oven — the kitchen filled with a scent so familiar it felt like a memory waiting to happen. Those soft, spiraled pastries combine a comfortingly familiar spice with pillowy dough, and they have a way of turning an ordinary morning into a small celebration. Whether you aim for gooey, bakery-style treats or lightly spiced buns for a weekday coffee, the process rewards patience and a few simple techniques. This article walks through history, ingredients, technique, variations, and practical tips so you can bake with confidence. Along the way we’ll touch on pairing and storage, and I’ll share a handful of tricks I learned the hard way.

From Nordic kitchens to American brunch tables: a short history

The story behind these sweet spirals stretches across continents. In Sweden, the kanelbulle — often flavored also with cardamom — has been a beloved fika companion for decades, with its own cinnamon bun day and strict rules about texture. In the United States, the pastry evolved into larger, icier versions topped with thick cream cheese glaze and dubbed sticky buns in some regions. Migration and commerce spread spices like cinnamon through Europe and the Americas, and local tastes shaped the final product differently everywhere it landed. Understanding that lineage helps when you choose whether to aim for a Scandinavian tinge or an American-style indulgence.

Historical versions emphasize warm spices and a tender crumb rather than flat sweetness. Early commercial yeast and improved milling in the 19th century made enriched doughs easier to produce at home, so these treats became household staples. Bakers adapted proportions of butter, sugar, and spice to suit climate and availability, which is why methods differ between regions. Today, modern kitchens offer reliable tools and ingredients, but the core idea remains the same: a soft dough, a spiced filling, a careful roll and bake. That simplicity is what makes the recipe so enduring.

Essential ingredients and what they do

To make excellent spiraled buns you don’t need exotic components, but you do need to respect the role each ingredient plays. Flour provides structure, yeast gives lift, fat tenderizes the crumb, and sugar not only sweetens but also feeds the yeast and aids browning. Milk and eggs enrich the dough, creating a softer texture than water-based recipes. Cinnamon is the flavor anchor, and its quality profoundly affects the final aroma and taste.

Below is a concise table showing common ingredients and their primary functions, useful when you adjust recipes or troubleshoot.

Ingredient Role in the dough
All-purpose flour Framework and texture
Yeast Leavening and flavor development
Butter Tenderness, flavor, and richness
Sugar Sweetness, browning, yeast food
Milk Moisture, softness, mild sweetness
Cinnamon Primary spice and aroma

When substituting, think about these functions rather than only replacing ingredients by volume. For example, using oil instead of butter will change tenderness and flavor, while swapping whole milk for skim will slightly dry the dough unless you increase fat elsewhere. Freshly ground cinnamon will outshine pre-ground tins if you want a brighter spice note. Small adjustments, made with purpose, deliver predictable results.

Tools and equipment that make the difference

A few kitchen basics will improve your outcomes and reduce frustration. A stand mixer with a dough hook isn’t mandatory, but it makes kneading less of a workout and guarantees consistent gluten development. A reliable kitchen thermometer helps test milk and dough temperatures for optimal yeast performance. A good rolling pin and a bench scraper speed shaping and cutting. Finally, a heavy sheet pan or ceramic baking dish ensures even browning.

If you bake frequently, affordable upgrades pay for themselves in time saved and better results. For instance, a silicone baking mat prevents sticking and reduces the need for extra flour that can toughen dough. An instant-read thermometer prevents guesswork when checking internal doneness and glaze temperatures. Even a simple proofing box — or a warm oven with the light on — helps yeast behave predictably. I keep a small scale for measuring flour; it removed inconsistencies between recipes and seasons more than any other single change.

Basic technique: building the dough

The foundation of a great bun is a well-made enriched dough. Start by warming milk to roughly 100 to 110°F when working with active dry yeast; this temperature wakes the yeast without scorching it. Combine warmed milk with a portion of sugar and yeast, give it five to ten minutes, and look for froth to confirm activity. Add the remaining sugar, softened butter, eggs and most of the flour, then knead until the dough is smooth and slightly tacky. A tacky surface indicates sufficient hydration without excess flour, which keeps the crumb tender.

Kneading can be hand work or machine work, but the goal is the same: develop gluten strands that hold gas and give structure while keeping the dough soft. For hand-kneading, use the push-fold-turn rhythm for ten to twelve minutes; a mixer will need less time. After the dough smooths and passes the windowpane test in chunks, shape it into a ball, oil the bowl lightly and cover. First rise should be until roughly doubled in size, which varies with room temperature but often takes one to two hours. This fermentation creates flavor as well as volume, so resist the urge to rush it.

Filling, rolling and cutting

Filling is where texture and contrast really come alive. A classic combination uses softened butter spread evenly over the rolled-out sheet, followed by a blend of brown sugar and ground cinnamon. The sugar melts during baking, creating pockets of goo, while cinnamon perfumes the entire pastry. For even distribution, use a spatula to leave a narrow margin along the edge to prevent spillover when rolling. Press the filling down lightly so it adheres to the dough and doesn’t slide during shaping.

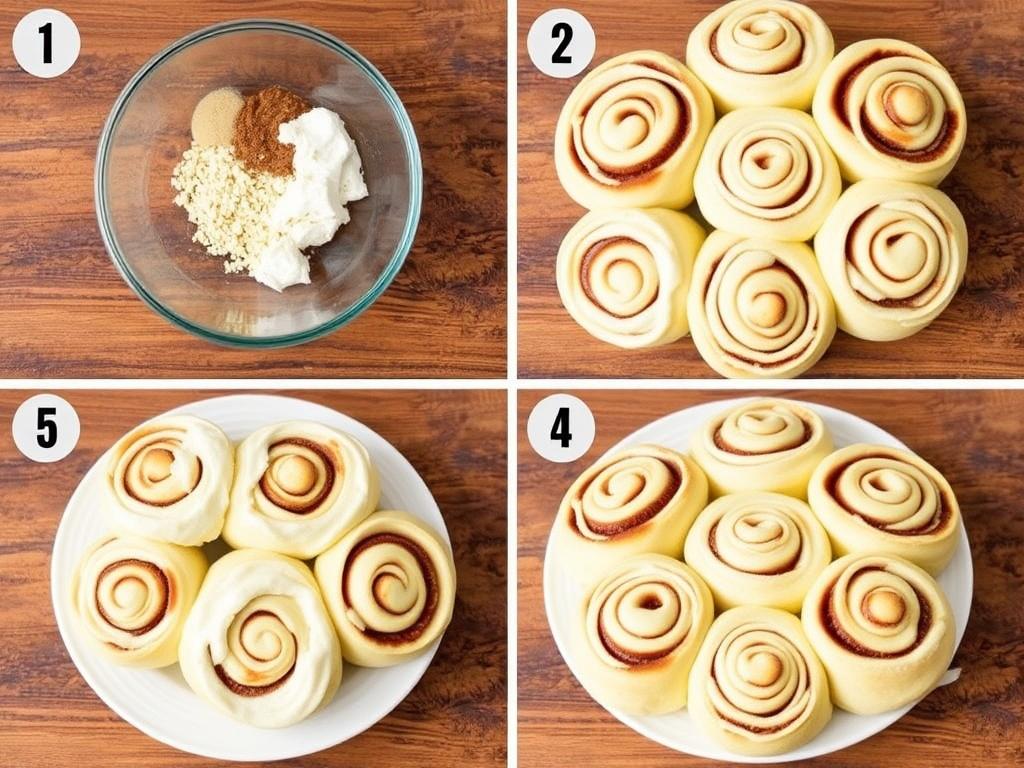
Rolling technique matters. Roll the dough into a rectangle of consistent thickness, then fold or roll tightly from the long edge to create many spirals rather than a few shallow coils. A tight roll produces defined swirls and prevents loose centers, but don’t compress the dough so much that it resists proofing. Use a bench scraper to cut even portions — dental floss works too for flossing clean slices. Arrange cut buns seam-side down in the pan, leaving space for final rise; they will puff and press into one another for soft sides when baked.

Proofing and baking: timing, temperatures and signals

Proofing time affects texture and flavor as much as ingredients. After cutting, allow rolls to proof for a second time until they show visible puffiness and roughly double in volume relative to the pan. Overproofing leads to flat, collapsed centers; underproofing yields dense dough that resists browning and yields tug-like texture. Aim for a final proof in a warm, draft-free place, and watch the dough more than the clock. In cooler kitchens, proof in an oven with the light on or over a bowl of warm water.

Bake at about 350°F for classic versions; heavier toppings or dense fillings may benefit from a slightly lower temperature to ensure full heat penetration before the exterior darkens. Rotate pans midway if your oven has hot spots. The internal temperature of a finished roll typically reads around 190 to 200°F for enriched doughs. They should be golden, slightly glossy from melted sugar, and spring back gently when pressed. Remove from the oven and apply glaze or icing while warm so it seeps into crevices.

Glazes and frostings: simple to decadent

A light powdered sugar glaze gives a delicate sheen and a touch of sweetness, while cream cheese frosting leans into richness and contrast. For a simple glaze, whisk powdered sugar with a splash of milk and a little vanilla until pourable. Spread or drizzle it while rolls are warm so it melts into ribbons. For a tangier finish, beat softened cream cheese with butter, powdered sugar and vanilla; this pairs especially well with sharper cinnamon notes and adds a custardy mouthfeel.

Consider texture when choosing a finish. A thin glaze highlights soft crumb and subtle spice, whereas a thicker frosting dominates the flavor and creates a more dessert-like result. For sticky buns that carry nuts, a caramel-style glaze with brown sugar and butter poured into the pan before baking creates a glossy, nut-laden topping. I tend to reserve thick frostings for weekend treats and keep weekday versions lighter, so the pastry pairs easily with a hot cup of coffee at breakfast.

Step-by-step classic recipe

Cinnamon Rolls. Step-by-step classic recipe

Below is a clear process that combines the principles described so far. Quantities can be scaled to your needs, but the sequence — mix, knead, rise, roll, fill, cut, proof, bake, finish — remains constant. Read through the full steps before starting so you can prepare ingredients and pans without rushing. Planning prevents things like sticky dough or scorched sugar and makes the experience far more enjoyable.

  • Warm milk to 100–110°F. Dissolve a tablespoon of sugar with the yeast and let it bloom for 5–10 minutes.
  • Mix flour, remaining sugar, salt, eggs, softened butter and activated yeast mixture. Knead until smooth and elastic.
  • Let the dough rise until doubled, about 1–2 hours in a warm place.
  • Roll dough into a rectangle, spread softened butter, sprinkle brown sugar and cinnamon evenly.
  • Tightly roll from the long side, slice into even pieces and place in a greased pan seam-side down.
  • Proof again until puffed, then bake at 350°F for 20–25 minutes or until golden and cooked through.
  • Glaze or frost while warm to allow the topping to melt into the spirals.

This structure teaches you what to expect at each stage and where to pay attention. Small changes in sugar or butter will alter the bake, but the procedure ensures a reliable result when followed carefully. Over time, you’ll internalize the look and feel of properly proofed dough and won’t need to check the thermometer as often.

Troubleshooting common problems

If your rolls come out dense, the usual suspects are underproofing, insufficient kneading or too much flour. Check dough elasticity during kneading and allow for a full first rise in a slightly warmer place. If centers stay doughy after baking, the oven temperature may be too low or the pan too crowded. Try lowering the oven slightly and increasing bake time to cook through without overbrowning.

Soggy bottoms often mean excess filling or a too-heavy glaze that melts and pools. Use slightly less butter in the filling and ensure the roll seams are firmly sealed before the second proof. For overly dark tops combined with underbaked interiors, shift the pan to a lower rack and tent with foil midway through baking. Small adjustments like these prevent waste and teach you how your oven behaves.

Variations and flavor experiments

Once you master the basic method, variations become playgrounds for creativity. Swap brown sugar for coconut sugar, add cardamom to the dough for a Nordic twist, or sprinkle chopped nuts and raisins into the filling for texture. For a citrus lift, add finely grated orange zest to the butter layer; it brightens heavy spice and pairs beautifully with a cream cheese finish. For a richer treat, caramelize the sugar and butter and pour it into the pan before arranging the rolls for an upside-down, sticky-top result.

Dietary adaptations are straightforward. Use plant-based milk and vegan butter to make dairy-free versions; add an egg replacer or extra fat to maintain tenderness. Whole wheat flour can add flavor and nutrition but often requires more hydration and a gentler touch to avoid heavy crumb. Gluten-free mixes vary considerably, so aim for blends designed for yeast-leavened goods and include binders like xanthan gum if needed. I frequently test smaller batches when experimenting to limit waste while dialling in proportions.

Healthy-ish approaches and portion control

These pastries are inherently indulgent, but modest tweaks help if you want to reduce sugar or fat without losing the essence. Cut the filling sugar by a quarter and compensate with a pinch of extra spice to sustain flavor. Use only a light glaze instead of thick frosting. Swap some all-purpose flour for whole grain to add fiber, but keep at least half white flour for the classic tender crumb. Portion control goes a long way; making smaller buns reduces per-serving sugar and makes them feel like an everyday treat rather than a rare splurge.

For people mindful of glycemic load, pair a serving with protein and fiber to slow sugar absorption: for example, serve a roll with Greek yogurt and berries or toss nuts into the morning plate. Recipe modifications will change texture and bake time, so accept trade-offs rather than demand identical results to the original. Small changes made with respect to the structure of the dough often yield the best compromise between health and pleasure.

Freezing, make-ahead strategies and storage

One of the best ways to make these pastries fit a busy life is to prepare ahead. The dough freezes well at several stages: as prepared dough balls, assembled unbaked rolls, or baked and cooled. For unbaked rolls, freeze on a tray until firm, then transfer to a bag. Thaw in the refrigerator overnight before the final proof and bake as directed. This approach lets you enjoy freshly baked buns with minimal morning effort.

Baked rolls store for two to three days at room temperature in a sealed container, and up to a week refrigerated. Reheat in a low oven wrapped loosely in foil to restore softness, or microwave briefly under a damp paper towel for a quick fix. Avoid leaving glazed buns uncovered — the glaze can set too hard and dry the surface. I often double the recipe and freeze half, which has saved many rushed mornings and impressed friends when unexpected company arrived.

Pairings and serving ideas

These pastries make a natural partner to many breakfast beverages. A medium-roast coffee complements sweet, buttery notes without overwhelming the spice. For a lighter pairing, try strong black tea or an aromatic chai that echoes the cinnamon. Milk or a milk-based espresso drink harmonizes with creamier frosting and helps balance sweetness. Serve fresh fruit alongside to add acidity and freshness that cut through richness.

Think beyond morning hours. Warm spirals work as afternoon treats with tea or dessert after dinner paired with a scoop of vanilla ice cream. For brunch gatherings, present a tray with multiple variations — some plain, some nutty, some citrus — so guests can sample different profiles. I once organized a small brunch where each batch had a distinct filling; the variety prompted delightful conversation and turned a simple menu item into the centerpiece of the table.

Culture, ritual and the small pleasures

Baking these pastries invites ritual and shared moments. In many households, the act of rolling and cutting becomes a communal task — kids can help press butter or sprinkle sugar, while adults manage the oven. Such routines transform a kitchen into a place of learning and reward. In Scandinavian cultures, the bun is more than food; it marks pause and company, an excuse to slow down with coffee and conversation.

My own Sunday ritual began as an experiment and became habit: I mix dough Saturday night, let it chill, and bake Sunday morning while the house is still quiet. The aroma acts like a gentle alarm clock, and fresh rolls elevate a simple breakfast into a mindful meal. These rituals matter because they make a small everyday act feel intentional and generous, which is why many home bakers keep returning to the same recipe.

Advanced tips for confident bakers

When you want to push quality further, focus on temperature control and ingredient quality. Use a digital scale to weigh flour and liquids; this precision removes much of the guesswork. Autolyse — resting the flour and water mixture before adding fats or sugars — can improve gluten development and make dough easier to shape. Cold fermentation in the refrigerator for 12 to 24 hours deepens flavor and allows for flexible timing.

For visible, defined spirals, chill the rolled log briefly before slicing; a firmer roll slices cleaner and keeps spirals tight. For extra shine and deeper browning, brush with an egg wash before baking. When making filled and topped versions, consider how each component melts and flows; nuts, for example, benefit from toasting first to preserve crunch after baking. These techniques are small investments that yield professional-leaning results without heroic effort.

Tools checklist

Here is a concise checklist of items worth having if you plan to bake regularly: a stand mixer or sturdy bowl for hand kneading, a rolling pin, a kitchen scale, an instant-read thermometer, a bench scraper, and a couple of reliable baking pans. Extras like silicone mats, pastry brushes and pastry cutters add convenience but are not strictly necessary. With these tools at hand, your process becomes smoother and outcomes more consistent.

Quality matters more than quantity when it comes to tools. A worn bench scraper still works, but a good rolling pin and a level baking sheet are harder to replace. Invest in basics that will see daily use and resist specialty gadgets that gather dust. I keep a simple metal bench scraper in my apron pocket; it finds jobs I didn’t plan for, from cutting dough to transferring slices, and always surprises with its usefulness.

At the end of the morning: savoring and sharing

There is a quiet satisfaction in slicing into a warm spiral and watching steam curl up, smell the cinnamon, and taste the soft interior punctuated by molten sugar. These pastries reward patience, small rituals and attention to detail, and the results are worth the few extra minutes of care. Whether you make them for a leisurely weekend breakfast, a holiday table or a practical freezer stash, each batch carries the warmth of hands-on baking.

Try a few versions to discover your favorite: lighter, airy buns for weekday mornings or richer, frosting-laden rounds for celebrations. Share the process with others and notice how the act of baking becomes memory-making. With basic ingredients, reliable technique and a willingness to experiment, you’ll soon be known for those irresistible spirals that turn ordinary mornings into something to look forward to.

Sunrise Skillet: Mastering Fried Sweet Potatoes and Eggs for a Better Breakfast

There is something almost ritualistic about a cast-iron skillet warming up on the stove, the smell of sweet potatoes beginning to caramelize, and eggs sizzling gently on top. This combination—crispy, slightly sweet tubers paired with silky yolks—has quietly become one of my favorite morning rituals. In this article I will walk through ingredient choices, technique, timing, and a handful of creative variations so you can make this dish reliably excellent. You will find practical tips, a clear method, and small tricks that save time without sacrificing flavor. Read on and you’ll discover how a simple sweet potato and eggs dish can become a weekday hero or a leisurely weekend centerpiece.

Why sweet potato and eggs pair so well

Sweet potato brings natural sweetness, a firm texture when roasted or fried, and a mellow starchiness that contrasts beautifully with the rich, savory quality of eggs. When you brown the edges of the sweet potato, sugars caramelize and create deep flavor notes that play nicely against creamy yolks. Eggs act as both protein and sauce—their runny yolks seep into nooks and soften the overall bite, making every mouthful more satisfying. Textural contrast matters: crisp edges, tender interior, and the cushion of a perfectly cooked egg. That balance is why this pairing works equally well at breakfast, brunch, or a simple dinner.

Essential ingredients and smart substitutions

Fried Sweet Potatoes and Eggs. Essential ingredients and smart substitutions

Start with good sweet potatoes; medium-sized roots with taut skin and even color work best for frying. Eggs should be fresh—fresh whites hold together better while cooking, and yolks are firmer and more flavorful. Use a neutral oil with a high smoke point for frying the potato, and consider finishing with a knob of butter for richness. Salt and pepper are non-negotiable, but a pinch of smoked paprika, cumin, or finely chopped rosemary elevates the dish. If you want to add vegetables, onions and bell peppers are classic, while kale or spinach can be stirred in near the end.

  • Primary: sweet potatoes, eggs, neutral oil, butter, salt, black pepper
  • Optional aromatics: onion, garlic, bell pepper, smoked paprika, cumin
  • Finishing items: fresh herbs, hot sauce, lemon, crumbled cheese

Tools and equipment that make a difference

A heavy skillet—cast iron, carbon steel, or a heavy-duty stainless pan—gives the best crust on the sweet potato and stable heat for cooking eggs. A good spatula helps you flip or fold without tearing delicate whites. A box grater or a sharp knife will determine whether you make matchstick fries, cubes, or thin rounds; each cut changes the finished texture. A splatter screen is useful when you work with more oil, and a lid or large plate can help finish eggs gently if you prefer over-easy. These small investments in tools translate directly into more consistent results.

Prep: how to cut sweet potatoes for frying

The way you cut the sweet potato determines the cooking time and texture. For quick frying choose thin coins or julienne matchsticks; they crisp up faster and develop more surface browning. If you prefer a tender center with a sturdy bite, go for 1/2-inch cubes, which take a little longer but hold their shape. Parboiling cubes for three to five minutes before frying reduces active pan time and ensures a soft interior without over-browning the exterior. No need to peel unless the skin is especially thick—leaving it on adds color and nutrients.

Step-by-step cooking method: frying the sweet potatoes

Begin by heating a couple of tablespoons of oil over medium-high heat until it shimmers; the pan should be hot but not smoking. Add the sweet potato pieces in a single layer so they have room to brown; overcrowding leads to steaming rather than crisping. Let them sit undisturbed for two to three minutes so a golden crust can form, then toss or flip to brown other sides. Reduce heat if edges darken too quickly, and add any onions or peppers after the potatoes have started to soften. Season in stages so the salt draws out moisture at the right time and helps with caramelization.

Timing and heat guide

Managing heat is the single most important factor when frying sweet potatoes: too cool and they become mushy, too hot and the exterior will char while the center remains uncooked. Medium-high heat is ideal for initial browning; after that, reduce to medium to finish cooking through. Use a lid briefly if the pieces are thick—this traps steam and speeds cooking without losing crispness. Below is a practical timing table to guide you based on cut size.

Cut Initial browning Finish (covered)
Matchsticks / thin coins 2–4 minutes 1–2 minutes
1/2-inch cubes 4–6 minutes 4–6 minutes
Thicker rounds (3/4-inch) 5–7 minutes 6–8 minutes

How to cook eggs to pair with fried sweet potato

There are several ways to prepare eggs for this dish, and each gives a different mood. Sunny-side-up or over-easy retains the runny yolk that acts like a sauce; frying the egg in a little butter adds flavor and richness. Scrambled eggs folded into the hash create a creamier, scrambled texture suitable for family-style breakfast. Poached eggs are elegant and keep the skillet less oily, and a baked egg nestled into a potato well is a showstopper. Choose the method that matches your timing and desired texture.

Technique: frying eggs in the same pan

After the sweet potatoes are nearly done, create a few shallow wells in the pan with the back of a spoon. Reduce heat to medium-low to avoid overbrowning the whites. Add a small splash of oil or butter to each well and crack eggs directly into them; cover briefly to set the whites while keeping yolks runny. This approach lets yolks mingle with the potato crust, producing the dish’s signature meld of flavors. If you prefer firmer yolks, leave the lid on slightly longer or flip eggs gently to cook the top.

Combining flavors: herbs, spices, and finishing touches

Simple seasoning transforms a humble skillet meal into something memorable. Smoked paprika introduces warmth and a hint of smoke, cumin adds earthiness, and a sprinkle of chili flakes brings brightness. Fresh herbs like cilantro, parsley, or chives cut through the richness and add a fresh aroma. Acid finishes—lime, lemon, or a light splash of vinegar—lift the whole dish and balance sweetness. A crumble of feta or cotija cheese lends salinity and creaminess that pairs exceptionally with sweet potato.

Variations to suit different tastes

This recipe is wonderfully adaptable. For a Mediterranean twist add roasted red peppers, olives, and oregano and top with a dollop of yogurt. For a spicy Southwestern version, use chorizo or smoked paprika, add black beans, and finish with avocado and cilantro. A sweeter approach works too: toss the potatoes with a touch of brown sugar and cinnamon and serve with eggs and a drizzle of maple syrup for a brunch-style treat. Vegetarian and vegan adaptations are easy—swap eggs for tofu scramble or chickpea flour “eggs” and you’ll keep the heartiness intact.

Serving suggestions: what to pair it with

On its own this dish is a complete meal, but a few simple sides can broaden the experience. A crisp green salad with lemon vinaigrette provides a sharp contrast to the skillet’s richness. Toasted bread or a warm tortilla turns it into a satisfying wrap or open-faced sandwich. For a larger brunch spread include roasted tomatoes, sliced fruit, and coffee or tea. Garnishes such as pickled onions or a bright chimichurri bring a lively finish that keeps people reaching for another forkful.

Meal prep and make-ahead strategies

Sweet potatoes hold up well to advance prep, which makes this an excellent weekday option. Cook the potato component up to two days ahead and refrigerate in an airtight container; reheat in a skillet to restore crispness. If you’re planning to batch-cook for the week, par-cook cubes and then flash-fry individual portions to finish. Eggs are best cooked to order, but scrambled eggs can be gently reheated; poached and fried eggs lose texture when refrigerated, so plan to make them fresh. Storing cooked potatoes with a paper towel in the container helps absorb excess moisture and preserves texture.

Nutrition: what you get from this dish

Fried sweet potatoes and eggs provide a balance of carbohydrates, protein, and healthy fats, making them a filling and nutritious choice. Sweet potato offers beta-carotene, fiber, and complex carbs that release energy steadily. Eggs deliver high-quality protein and essential nutrients such as choline, vitamin D, and B vitamins. The dish can be tuned for health goals: reduce oil for lower calories, add greens for fiber, or include avocado for heart-healthy monounsaturated fats. Overall, it’s a nutrient-dense option that satisfies both appetite and taste.

Troubleshooting common problems

If sweet potatoes turn out soggy, the usual culprit is overcrowding the pan or insufficient initial heat—give pieces space and time to brown. If edges burn while centers stay hard, lower the heat and allow more time for cooking or cut pieces smaller. For rubbery whites on eggs, cook them at a gentler temperature and consider covering briefly to set without toughening. When potatoes stick to the pan, raise the heat a touch and let the stuck bits release naturally before scraping; a good pan will free them once a crust has formed. Small adjustments in cut size, heat, and oil resolve most issues.

Flavor pairings and beverage suggestions

Herbs with bright, green notes—cilantro, parsley, chives—work well to contrast the potato’s sweetness. Spicy condiments like harissa or salsa add warmth and complexity without overwhelming eggs. For drinks, a robust coffee or a simple latte complements the caramelized flavors nicely at breakfast. If serving later in the day, a light herbal tea or a crisp white wine pairs surprisingly well. Think contrast: an acidic beverage highlights sweetness, while a bitter or tannic drink offsets richness.

Scaling up for guests

To feed a group, use an oven-friendly pan and double the quantities, then finish eggs under the broiler or in the oven so everyone gets a hot plate. Spread the fried sweet potatoes across a sheet tray and keep warm in the oven at low heat while you fry fresh eggs. Alternatively, set out the potatoes and a platter of scrambled eggs and let guests assemble their plates buffet-style. Timing is essential when scaling; aim to have the potato component ready and reheat briefly for maximum texture.

Personal notes from years of morning practice

I remember the first time I deliberately paired caramelized sweet potato with a runny egg; I was chasing something warm and uncomplicated on a grey morning. The texture surprised me—the way yolk softened the edges and the sweet notes cut through typical morning bitterness. Over time I learned small habits: salt the potatoes in stages, don’t rush the first sear, and always taste near the end. These details made the dish consistent and turned a simple breakfast into something I looked forward to making. Sharing it with friends became a quick way to make a gathering feel casual and thoughtful.

Recipe card: a reliable skillet method

Below is a concise, practical recipe to use when you want to make this dish without fuss. The method emphasizes technique so you can adapt easily based on what you have in the kitchen. Quantities are flexible; adjust based on appetite and how many people you’re feeding. This is a framework rather than a rigid formula—feel free to riff.

  • 2 medium sweet potatoes, peeled or scrubbed and cut into 1/2-inch cubes
  • 3 tablespoons neutral oil plus 1 tablespoon butter
  • 1 small onion, thinly sliced (optional)
  • Salt, black pepper, smoked paprika to taste
  • 4 large eggs
  • Fresh herbs and hot sauce for finishing

Cooking steps

Heat a heavy skillet over medium-high heat with oil. Add sweet potatoes in one even layer and let them sit to form a crust, stirring every few minutes until golden on multiple sides. Add sliced onion halfway through, if using, and season gradually. When potatoes are tender and browned, lower heat to medium-low and make wells for the eggs; add butter and crack eggs into the wells. Cover briefly until whites are set and yolks are at desired doneness, then finish with herbs and a grind of pepper.

Make it your own: final encouragements

Food becomes meaningful when it suits your rhythms and tastes, and this dish is forgiving enough to invite experimentation. Swap spices, fold in greens, or use different cheeses until you find your version. Keep a small jar of toasted seeds or chopped nuts to scatter at the end for crunch. The essential idea is straightforward: create contrast and balance between the sweet, crisp potatoes and the creamy, savory eggs. With a few tries you’ll discover a reliable formula that fits your mornings.

Parting practical tips

Keep your knife skills honest; uniform pieces cook more predictably. Taste as you go, especially near the end when seasoning makes the final leap. If in doubt about oil amount, start with less—you can always add, and excess oil can make the dish greasy. Use the right pan for the job, and let it heat properly before potatoes touch the surface. Little attentions like these turn a good breakfast into a great one, and they make the process feel effortless over time.

Bright Bowls of Spring: A Practical Guide to Vegetable Pasta Primavera

Imagine a steaming plate where tender pasta meets crisp, colorful vegetables, kissed by citrus and herbs. That image captures the spirit of Vegetable Pasta Primavera, a dish that celebrates seasonality, texture and simple technique. In this article I will walk you through the history, ingredient choices, hands-on steps and creative variations so you can make a memorable primavera at home. Expect concrete measurements, sensory cues and troubleshooting tips that turn a good attempt into a reliably great dinner. Along the way I’ll share a few personal discoveries from years of cooking and testing this recipe for family and friends.

Where Primavera Came From and Why It Still Matters

Primavera, which literally means “spring” in Italian, didn’t arrive on dining-room tables as a mysterious invention. The phrase became associated with vegetable-and-pasta combinations in the mid-20th century when cooks began emphasizing seasonal produce tossed with pasta and light sauces. It gained international attention as chefs and home cooks embraced bright, vegetable-forward plates as an antidote to heavier, cream-based dishes. The idea was simple: showcase fresh produce without overwhelming it.

What makes this concept enduring is its flexibility and immediacy. You can scale the recipe up for a casual gathering or slim it down for a weeknight supper. The technique—par-cooking or quickly sautéing vegetables so they remain vibrant—works for almost any set of produce. Because freshness and timing matter more than elaborate steps, primavera remains a great platform to learn about balance: contrast textures, harmonize flavors, and use acid to lift the whole dish.

Choosing Vegetables: A Palette of Color and Texture

Vegetables define the dish, so choose them with intention. Think in terms of color, texture and cooking time. Fast-cooking items like asparagus tips, peas and baby spinach add bright color and soften quickly. Firmer vegetables such as carrots, bell peppers and broccoli florets need a bit more time or a quick blanch to reach that al dente stage without turning mushy. Combining both kinds gives the plate depth and keeps every bite interesting.

Seasonality matters, but so does balance. If you pick three to five vegetables, aim for contrast: one crisp, one sweet, one leafy and perhaps one with an earthy flavor. When spring supplies are abundant, I often use sugar snap peas, young zucchini, radishes and lots of herbs. In late summer the same framework shifts to cherry tomatoes, summer squash and roasted peppers. The method remains consistent even as ingredients change.

Suggested vegetable list

Below are vegetables that work especially well, grouped by cooking time and character. Mix and match based on availability and your taste.

  • Quick-cook and tender: peas, baby spinach, cherry tomatoes, thinly sliced zucchini
  • Medium-cook and crisp: asparagus, bell peppers, green beans, snap peas
  • Firm and hearty: broccoli florets, carrots, fennel, cauliflower
  • Alliums and aromatics: garlic, shallots, spring onions, fresh herbs

Pasta Selection: Shape and Function

Pasta is more than a carrier for vegetables; its shape influences how sauce and produce interact. Long strands such as linguine or spaghetti wrap around vegetables and herbs, creating a cohesive bite. Tubes and shells trap little pieces of veg in their hollows, which is delightful when you have peas or tiny corn kernels. Short twists like fusilli and gemelli are brilliant at trapping thin ribbons of sautéed zucchini and shallot.

Another decision is whether to use dried or fresh pasta. Dried pasta offers reliable timing and a slightly firmer bite after cooking, which pairs well with crisp vegetables. Fresh pasta becomes silkier and feels richer, so it pairs beautifully with lighter, brighter vegetables and a simple olive oil-based sauce. Whatever you choose, cook it to al dente and reserve some of the starchy pasta water—this will be essential for finishing the sauce and bringing everything together.

Sauce and Flavor Building: Light, Layered, and Flexible

Primavera traditionally avoids heavy sauces. Instead it favors simple emulsions—olive oil, a touch of butter, bright lemon, grated cheese and fresh herbs. The goal is to enhance the vegetables, not mask them. Start by sweating aromatics like garlic and shallot in good olive oil, then add vegetables according to their cooking times. Finish with an acid and fresh herbs to brighten the whole dish.

Umami and depth can be introduced without turning the plate heavy. A splash of vegetable stock, a tablespoon of grated Parmesan or Pecorino, a few anchovy fillets dissolved in the oil, or a gentle dusting of toasted breadcrumbs can all add complexity. When I want a creamier mouthfeel, I sometimes stir in a spoonful of ricotta or a swirl of crème fraîche at the end, but that’s optional and best used sparingly.

Flavor-building checklist

  • Base fat: extra virgin olive oil and optional butter
  • Aromatics: garlic, shallot, or spring onion
  • Acid: fresh lemon juice and/or a splash of white wine
  • Herbs and finishing touches: basil, parsley, chives, grated hard cheese

Step-by-Step Recipe for a Reliable Primavera (serves 4)

Below you’ll find a tested recipe with clear measures and sensory cues. The key moments to watch are vegetable timing, pasta doneness and sauce emulsification. Keep mise en place ready so everything moves smoothly from pan to plate at the right times. If you prefer a vegetarian or vegan variation, see the later section on substitutions.

Ingredient Amount Notes
Pasta (linguine, penne or fusilli) 400 g / 14 oz Cook to al dente; reserve 1 cup pasta water
Olive oil 4 tbsp Extra virgin for finishing
Garlic, thinly sliced 3 cloves Or use 1 shallot finely chopped
Asparagus, trimmed
Bell pepper, sliced
Cherry tomatoes, halved
Peas, fresh or thawed
Baby spinach
200 g asparagus
1 medium pepper
200 g tomatoes
100 g peas
100 g spinach
Mix of textures
Lemon 1, zested and juiced Use zest for fragrance
Parmesan cheese 50 g grated Optional: substitute nutritional yeast for vegan
Salt and black pepper To taste Adjust at the end
Fresh herbs (basil, parsley) Handful, chopped Add at the end for freshness

Begin by bringing a large pot of salted water to a rolling boil. While the water heats, trim and slice your vegetables. Cut asparagus on the diagonal into 1.5 inch pieces, slice bell pepper into thin strips and halve the cherry tomatoes. Keep the spinach leaves whole if they are small or roughly chop larger leaves. This prep allows you to layer vegetables into the pan according to how quickly they cook.

Start cooking the pasta a minute or two before your vegetables will be ready so they finish together. In a wide skillet, warm two tablespoons of olive oil over medium heat and add the garlic or shallot. Sauté briefly until fragrant and just turning golden; be careful not to burn it. Add the firmer vegetables first—carrots, cauliflower or broccoli—and toss for a couple minutes. Follow with medium-cook items like asparagus and peppers, then finish with tomatoes, peas and spinach so they keep color and texture.

When the pasta reaches al dente, drain it, reserving about one cup of the starchy water. Transfer the pasta to the skillet with the vegetables, or if your skillet isn’t big enough, combine everything back in the pasta pot. Add the lemon zest and juice, the remaining olive oil and half the grated cheese. Toss vigorously, using spoonfuls of reserved pasta water to create a glossy sauce that clings to both the noodles and vegetables. Taste and season with salt and pepper, then stir in the herbs and remaining cheese right before serving.

Techniques and Timing: Getting the Texture Right

The difference between a good primavera and a great one is texture control. Vegetables should be cooked so they are tender yet retain a slight bite. Overcooked vegetables lose color and pleasure. One reliable technique is blanching and shocking: briefly boil firmer vegetables, then plunge them into ice water to stop cooking and preserve brightness. Finish them in the pan just to warm through and pick up flavor.

Another method I use regularly is staggered sautéing. Start with the vegetables that need the most time, add the medium ones a few minutes later, and reserve the quickest-cooking items for the final minute. This staged approach mimics a restaurant rhythm and keeps everything lively. Remember to season vegetables lightly at each stage; salt helps draw out moisture and concentrates flavor.

Troubleshooting common issues

If your pasta seems dry, add a splash more pasta water and olive oil and toss until glossy. If the vegetables are undercooked, remove the pasta and finish the vegetables gently with a lid on the pan for a minute or two, then recombine. If the dish tastes flat, brighten it with lemon zest or a pinch more salt. Little adjustments matter more than large interventions when you’re close to done.

Serving, Pairings and Presentation

Primavera is visually inviting, so presentation matters. Serve in shallow bowls that display the colors. A final scatter of torn basil leaves, a drizzle of good olive oil and a few curls of Parmesan make a strong first impression. Textural contrasts such as toasted pine nuts or breadcrumbs add an appealing crunch and refocus the palate.

For beverages, light to medium wines pair well: an unoaked Chardonnay, a crisp Pinot Grigio or a chilled rosé complement the fresh flavors. Non-alcoholic options include sparkling water with lemon or a cold herbal iced tea. For a fuller meal, add a simple green salad and crusty bread for scooping. The dish also works well as part of a buffet since it can be served warm or at room temperature without losing charm.

Adaptations for Dietary Needs

Vegetable Pasta Primavera. Adaptations for Dietary Needs

Primavera adapts easily to vegan, gluten-free and lower-calorie diets without losing character. To make the dish vegan, swap the cheese for nutritional yeast or a spoonful of salted cashew cream and replace butter with additional olive oil. For gluten-free needs, use a rice or corn-based pasta; follow the same al dente timing as you would for regular pasta. Note that gluten-free varieties can absorb sauce differently, so use a touch more starchy pasta water if needed.

Protein additions are optional. If you want to make the dish more substantial, add pan-seared chicken, shrimp or chickpeas. Cook proteins separately and fold them in at the end to avoid overcooking. This keeps the vegetables as the showpiece while boosting the plate’s satiety and nutritional range.

Make-Ahead, Storage and Reheating

Primavera is best eaten the day it’s made, but it stores reasonably well. Keep pasta and vegetables together in an airtight container for up to two days in the refrigerator. To reheat, warm gently in a skillet with a splash of water or stock to rehydrate and bring back silkiness. Avoid microwaving without adding moisture, as the pasta can dry out and the vegetables lose their texture.

If you plan to make components ahead, blanch firmer vegetables and store them separately in ice water, then drain and refrigerate. Cooked pasta stashed in the fridge can be revived by tossing it in hot olive oil and a little pasta water. For meal prep I sometimes double the vegetables and halve the pasta so I can add fresh pasta later for better texture on day two.

Personal Notes and Experiments from My Kitchen

I’ve cooked primavera in dozens of forms, from minimalist bowls to festive platters for summer dinners. One memorable experiment involved roasting rather than sautéing the vegetables: I roasted bell peppers, asparagus and cherry tomatoes with a drizzle of oil and a sprinkle of smoked paprika, then tossed them with hot pasta. The smokiness and concentrated sweetness from roasting contrasted beautifully with lemon and basil.

Another trick I learned from a friend is to finish the dish with a little grated lemon zest folded into the cheese. That small addition intensifies aroma and makes the plate feel fresher. For gatherings, I make a large pan early, loose the dressing a bit, and briefly reheat before serving while adding fresh herbs and a squeeze of lemon to revive the brightness.

Creative Variations to Try

Once you know the basic method, you can get playful. Try a pesto-forward version using blanched greens and almonds instead of basil and pine nuts. Swap in roasted winter squash and kale for a fall take, adding a touch of sage. For a Middle Eastern spin, finish with toasted za’atar and a dollop of labneh or strained yogurt. Each twist keeps the framework intact but shifts the dish’s personality.

Seafood lovers can add small seared scallops or quick-cooked shrimp. For a smoky note, stir in a few strips of charred poblano pepper. If you like heat, use thinly sliced chilies or a pinch of red pepper flakes during the sauté. These tweaks let you tailor the dish to seasons, pantry contents and mood without changing the essential technique.

Simple substitutions table

Ingredient Swap for Effect
Parmesan Nutritional yeast or vegan Parmesan Saves dairy, adds umami
Butter Extra virgin olive oil Less rich, lighter finish
Linguine Penne, fusilli, gluten-free pasta Different texture; holds sauce differently
Fresh peas Frozen peas Convenient and still sweet when thawed briefly

Final Serving Tips and Parting Suggestions

When plating, keep a small bowl of grated cheese and extra lemon wedges on the table. Encourage guests to add to taste; a final squeeze of lemon brightens and personalizes every bowl. If you want a restaurant-style finish, spoon a few tablespoons of the reserved hot pasta water over the plated dish and swirl in a drizzle of best-quality olive oil just before serving.

Vegetable Pasta Primavera is a kitchen-friendly canvas—seasonal, forgiving and endlessly variable. Once you master the timing and the small habit of reserving pasta water, you’ll find it a dependable weekday dinner and a celebratory option for company. Try it with different vegetables throughout the year and notice how a few small changes refresh the dish while keeping its essence intact. Enjoy the colors, the textures and the simple pleasures of a truly vegetable-forward pasta plate.

Buffalo Chicken Salad: A Spicy, Tangy Twist on a Classic

I still remember the first time I tried a version of this dish that stopped me in my tracks: crunchy greens topped with fiery, tangy meat, creamy dressing that cooled the heat, and a scattering of blue cheese that made everything sing. That memory—bright, messy, and unapologetically bold—captures why this salad has become a favorite at casual dinners, game-day gatherings, and even rushed weekday lunches. In this article I will walk you through what makes the dish work, how to build it from the ground up, and how to make it fit your table whether you want comfort food or something lighter. Expect practical techniques, ingredient swaps, and a few real-life habits I developed after cooking it dozens of times. By the end you’ll know how to make a bowl that balances heat, texture, and flavor without relying on a restaurant kitchen.

What is Buffalo Chicken Salad?

At its heart this is a salad that borrows the flavor profile of Buffalo-style wings: hot sauce, butter or oil, and a sharp, vinegary bite paired with cooling elements. Instead of serving the spicy chicken with celery and a dip, the chicken becomes the centerpiece of a composed salad that combines lettuce, vegetables, cheeses, and a dressing that mirrors the wing experience. You will find versions that use shredded meat, diced breast, or even fried tenders, which changes the texture but not the idea. The dish is flexible, moving easily from a hearty entrée salad to a lighter tossed salad depending on portions and dressing choices. What unites the variations is a tension between heat and creaminess, and a focus on bold, direct flavors.

Origins and the Buffalo connection

Buffalo Chicken Salad. Origins and the Buffalo connection

The term “Buffalo” traces back to Buffalo, New York, where the original Buffalo wings were born in the 1960s. That iconic snack paired fried chicken with a vinegar-forward hot sauce and a generous dollop of cooling blue cheese dressing, and the combo proved irresistible. Translating that concept into a salad was a natural progression: people wanted the same flavors but in a format that felt more balanced and, at times, healthier. Over the decades the idea spread beyond wings and became a template—take a spicy protein, add crunchy and cool elements, finish with a creamy, tangy dressing. The salad is as much a reinterpretation as it is a tribute, keeping the spirit while allowing cooks to play with technique and texture.

How the flavors work together

Successful versions hinge on contrast. Spicy hot sauce provides the immediate punch, acidic notes cut through fat, and a creamy element like blue cheese or ranch tames the heat while adding a luscious mouthfeel. Crunch is essential because it gives the dish lift; otherwise the bowl risks feeling flat. Vegetables contribute freshness and occasional sweetness which can be important when the chicken is very spicy. Textural variety also helps the palate forgive mistakes in seasoning; crisp romaine, thinly sliced red onion, and toasted seeds rescue a salad with underseasoned meat.

Key components and sensible substitutions

At a minimum plan for spicy protein, a leafy base, a cooling dressing, and at least two kinds of crunch or fresh veg. The protein can be grilled, baked, shredded from a roast, or quick-fried tenders. For leaves I favor a mix of romaine for structure and butter lettuce or baby greens for tenderness. Blue cheese and ranch are the classic dressings, but Greek yogurt-based dressings or a light vinaigrette can work if you want less richness. Toppings such as celery, carrots, scallions, or toasted nuts give essential texture and can be swapped depending on what’s in your fridge.

Ingredient guide and substitutions

Below is a simple table that maps primary ingredients to their roles and possible swaps. Use it as a quick reference when you want to adapt the recipe to what you have or to dietary needs. I include common pantry substitutions so you can still build a satisfying bowl without a special grocery run. Remember that swapping ingredients will change the final balance of the salad so adjust seasoning and dressing amounts accordingly.

Ingredient Role Substitutions
Chicken breast or thighs Main protein – texture and body Turkey, tofu, tempeh, jackfruit for vegan
Hot sauce (Frank’s-style) Primary heat and vinegar note Sriracha, chili paste + vinegar, buffalo sauce from jar
Blue cheese Creamy cooling accent Feta, goat cheese, Greek yogurt dressing
Romaine / mixed greens Leafy base for structure and freshness Spinach, kale (massage first), iceberg for crunch
Celery, carrots Crunch and freshness Jicama, fennel, cucumber, toasted seeds

Cooking the chicken: methods that work

How you cook the poultry changes the character of the salad more than you might think. Grilling adds smoky notes and a char that pairs beautifully with hot sauce, while roasting or baking gives a clean, even texture that soaks up dressing well. For speed, poaching or shredding rotisserie meat is a great option because it absorbs the sauce quickly and requires minimal hands-on time. If you prefer extra crunch and indulgence, frying small tenders yields an experience closer to the original wings. No matter the method, seasoning the chicken before saucing and finishing with a short rest will keep juices locked in and prevent dryness.

Making and balancing the Buffalo-style sauce

A basic Buffalo sauce is simply hot sauce whisked with melted butter, oil, or a neutral fat to temper the heat and give the sauce body. The butter brings a silky richness and the hot sauce provides the vinegar bite; both are important. For a lighter option replace some or all of the butter with olive oil or a neutral vegetable oil, and for a deeper flavor add a touch of honey or brown sugar. If you want less heat, fold the sauce into mayo or yogurt to create a thinner coating that still carries flavor. Taste as you go and remember that the final balance should taste bright and spicy but not flat or overly greasy.

Preparing crispy or tender textures

Texture matters more than people often admit. If you like a crisp crust, dredge pieces in seasoned flour or panko and shallow fry until golden, then toss quickly in warm sauce so the coating stays crunchy under the dressing. For a lighter crust, bake at high heat on a wire rack to allow airflow and maintain crispness. If you opt to shred the cooked meat, toss it in warm sauce and briefly broil to let edges crisp while keeping the center tender. Toasting seeds or breadcrumbs and adding them as a final sprinkle gives crunch without extra fat. These small choices turn a good bowl into a memorable one.

Assembling the salad like a pro

Start with a chilled bowl and layer thoughtfully: greens first, then vegetables, and finally the sauced protein so it sits on top and stays visible. Place heavier, denser items closer to the base so the bowl carries well and doesn’t tip when you lift it. Drizzle dressing sparingly and toss gently at the table, or serve dressing on the side to let guests control the amount. Scatter final accents like crumbled cheese, herbs, and toasted nuts just before serving so they remain crisp. Presentation matters; a composed bowl invites people to dig in and makes the balance of flavors obvious at first bite.

Dressings: blue cheese, ranch, and lighter choices

Classic blue cheese dressing is the natural partner for the Buffalo profile, bringing saltiness and a creamy counterpoint to the heat. Ranch is milder and easier for crowds, especially those sensitive to strong cheeses. If you want a lighter option, mix Greek yogurt with lemon, a touch of vinegar, and chopped herbs to create a tangy, protein-rich dressing that still calms the spice. A simple vinaigrette with apple cider vinegar and a little honey can work surprisingly well when the protein is very spicy, as the acid brightens and the sweetness rounds heat. Try small tasting adjustments until the dressing complements rather than competes with the chicken.

Vegetables, cheeses, and crunchy add-ins

Vegetables are where the salad gains balance. Celery and carrots echo the wing tradition and add essential crunch, while tomatoes and cucumbers offer juiciness and cool spots. Red onion or scallions introduce a sharpness that cuts through the richness. Cheese choices extend beyond blue cheese; a crumble of feta or a sprinkle of sharp cheddar both change the salad’s profile in interesting ways. For crunch try roasted chickpeas, sunflower seeds, or toasted breadcrumbs to add complexity without extra grease. These components allow you to customize the dish for texture and dietary preference.

Serving suggestions and pairings

This dish pairs well with sides that either double down on the experience or provide contrast. A crisp, simple slaw or pickled vegetables will freshen heavy bites, while potato wedges or sweet potato fries make the meal heartier and more indulgent. For drinks, a cold lager or a citrusy pale ale complements the spice; for non-alcoholic options try iced tea with lemon or a sparkling water with cucumber. Consider the occasion: for casual gatherings set out bowls of extra sauce and sliced veggies, while for a dinner plate serve the salad with a composed grain pilaf or roasted vegetables. The right pairing amplifies the meal’s strengths rather than competing with them.

Variations to keep things interesting

There are many ways to reinterpret the concept. Swap the poultry for tofu or tempeh and use a vegan butter alternative to make a plant-based version that retains the signature heat. Turn the bowl into a warm grain salad by placing sauced chicken over quinoa or farro, then adding roasted vegetables and a drizzle of yogurt dressing. Wraps are another crowd pleaser: wrap the sauced protein, greens, and dressing in a large tortilla for a portable meal. Even within the chicken versions you can play with spice blends, smoking the meat lightly for barbecue notes or adding citrus zest to brighten the sauce.

Meal prep and storage tips

Buffalo-style salads adapt well to meal prep if you keep components separate. Store greens in one container, cooked sauced protein in another, and dressing in a small jar. Assemble only when you’re ready to eat to avoid soggy leaves and preserve textures. If you plan to reheat sauced chicken, do it briefly in a hot pan to revive edges rather than microwaving until soft. Refrigerated portions will generally keep for three to four days, but fresh-cut vegetables and crumbled cheeses are best added the day of serving. This approach makes it possible to enjoy a near-fresh bowl even on busy weekdays.

Nutrition and ways to lighten the bowl

The salad can be made either indulgent or lean depending on your choices. Using grilled chicken, a yogurt-based dressing, and more greens keeps protein high and calories moderate. To reduce sodium, choose a low-salt hot sauce or control the amount you add, and rinse canned or pickled components. Swapping blue cheese for crumbled reduced-fat feta lowers calories while maintaining a tangy note. Adding a legume like chickpeas increases fiber and satiety, which is helpful if you’re watching portions. Small swaps add up and can yield a version that matches your nutrition goals without losing flavor.

Common mistakes and how to avoid them

One frequent error is over-saucing the chicken so it becomes soggy and clumpy; toss protein lightly and reserve some sauce for drizzling. Another mistake is neglecting seasoning; properly salted chicken tastes noticeably better even if the sauce is bold. Serving warm sauced meat over cold greens without a buffer can wilt delicate leaves, so place the protein on the side or on sturdier lettuce. Using low-quality hot sauce or unused pantry spices leaves the dish flat, so choose ingredients that you enjoy on wings. Lastly, don’t skip a small test-taste step: reheating a sauce or adjusting dressing acid before serving can rescue a nearly perfect bowl.

My personal tweaks and anecdotes

When I host game nights I always make a large batch of sauced chicken and offer three dressing options; friends can build their bowl and everyone is happy. Over time I learned that a touch of honey in the sauce calms bitter notes on cheap hot sauce and provides a rounded finish. Another habit I developed is to toast breadcrumbs with garlic and sprinkle them on top for a smoky crunch that is unexpectedly addictive. Those small rituals transformed a simple recipe into something people ask for, and the technique transfers to other spicy salads as well. Cooking it repeatedly taught me to keep a bowl of celery and carrots on the side for those who want a crunchy palate cleanser.

Quick, reliable recipe for a weekday bowl

This recipe is designed for efficiency without sacrificing character, and it scales easily. Prep the chicken and sauce in about 20 minutes, then quickly assemble the bowl for a satisfying lunch or dinner. Timing matters: cook the protein first and keep the dressing and fresh elements ready so assembly is fast. The method is intentionally flexible so you can swap grilling for oven-roasting without changing steps. Below is a straightforward procedure to follow when you need a dependable result.

  1. Ingredients: 2 chicken breasts, 1/2 cup hot sauce, 2 tbsp butter or oil, 6 cups mixed greens, 1/2 cup crumbled blue cheese or feta, 1 cup sliced celery and carrots, 1/4 cup chopped scallions, olive oil, salt and pepper.
  2. Cook chicken: season breasts with salt and pepper and grill or sear in a hot pan about 5-6 minutes per side until internal temp reaches 165°F. Let rest and slice thinly.
  3. Make sauce: warm hot sauce with butter or oil until combined, add a teaspoon of honey if desired. Toss sliced chicken in warm sauce to coat.
  4. Build bowls: divide greens into two bowls, arrange sauced chicken on top, scatter celery, carrots, scallions, and cheese. Drizzle a little extra sauce or a spoonful of dressing on the side.
  5. Serve immediately with lemon wedges and extra dressing for guests to adjust heat. Leftovers keep components separate for up to three days in the fridge.

Troubleshooting on the fly

If the bowl turns out too spicy add a dollop of plain yogurt or a squeeze of lemon to mellow the heat quickly. For a greasy feeling, balance with acid like apple cider vinegar or pickle brine which cuts richness. If the leaves wilt prematurely, that means the protein was too warm – let it cool slightly before assembly next time. A bland profile usually comes down to under-salting either the chicken or the dressing; a small pinch of salt often sharpens all flavors. These quick fixes rescue a meal without requiring a complete remake.

Bringing Buffalo flavors to other dishes

Once you understand the components that define this flavor profile you can apply them broadly. Try buffalo-seasoned meat over roasted vegetables for a simple sheet-pan meal, or blend sauced protein into a grain bowl with roasted squash and avocado for seasonal variety. Even simple snacks benefit: toss popcorn in a light buffalo butter for a game-night twist. The principle is consistent: a lively hot sauce, a fat to bind it, and a cooling counterpart to finish the dish. Experimenting with those elements keeps your cooking fresh and adventurous.

Final thoughts and next steps

Buffalo-style chicken in salad form is versatile, satisfying, and forgiving, and learning a few core techniques unlocks many variations. Start by mastering sauce balance and a reliable method for cooking the protein, then experiment with textures and dressings to suit your mood. Keep a few staples on hand—good hot sauce, sturdy greens, and a cooling dairy or alternative—to assemble a quick bowl any night of the week. With these building blocks you can craft everything from a light lunch to a party-worthy platter that honors the original wing while offering something new.

Sweet Heat on the Skillet: Mastering Maple Glazed Pork Chops

There is something quietly thrilling about the moment a simple pork chop meets a hot pan and a sticky, amber glaze. This recipe marries the warm sweetness of maple with a touch of acidity and spice to lift the meat without masking it. Whether you are cooking for a weeknight supper or aiming to impress at a dinner party, the technique is straightforward and forgiving, and the flavors feel both familiar and new. In the paragraphs that follow I will walk you through why maple is such a natural partner to pork, how to pick and prepare the best chops, the exact steps to produce a glossy glaze, and a handful of variations and side pairings that really sing together. Expect practical tips, a reliable recipe, and a few personal notes from my own kitchen experiments to make these patties of joy consistently excellent.

Why maple and pork are a natural pairing

Maple syrup brings more than sweetness: it offers caramelization and a complex, resinous flavor that complements pork’s natural fattiness. When maple cooks down with a little acid or salt, its sugars go beyond simple sweetness and develop deep, nutty aromas that latch onto the surface of the meat. Pork chops are robust enough to stand up to that richness without being overwhelmed, so the result is balanced rather than cloying. In addition, maple’s vegetal honey notes highlight browned bits from searing, making every bite interesting and layered. Understanding this chemistry helps you use less sugar and more technique to achieve a glaze that tastes refined rather than sugary.

Another reason this pairing works is texture: a proper glaze creates a thin, sticky coating that contrasts with a juicy interior. That exterior sheen comes from reducing maple syrup with aromatics and a small amount of butter or oil, plus sometimes mustard or vinegar to add bite. The glaze both seals in juices and provides visual appeal, which is why finishing techniques like spooning the pan sauce over the chops matter. Finally, maple’s familiar, autumnal smell evokes comfort, so these chops often feel like a nostalgic, grown-up dish rather than an experimental one. Little gestures—like adding crispy shallots or a sprinkle of chopped herbs—turn the plate into something worth returning to again.

Choosing the right pork chops

Picking the right chop is the first practical decision that affects timing and flavor. Thickness is key: aim for chops about 1 to 1.5 inches thick to allow for a good sear and a gentle finish in the oven or on a lower heat. Too thin and they overcook before the glaze can develop; too thick and you risk under-seasoning the interior or needing a longer cook time that burns the glaze. Bone-in chops often deliver more flavor and stay juicier, thanks to the bone’s thermal mass and connective tissues that break down during cooking.

Quality matters beyond thickness: look for pale pink meat with a fine grain and a modest fat cap. That fat will render and carry the glaze, so don’t trim everything away. If you can, choose chops from heritage breeds or butcher-sourced cuts for better taste and texture; however, supermarket chops can be excellent if chosen carefully. For boneless options, choose center-cut loin chops to avoid meat that dries quickly. Finally, consider the intended audience: if you want a fuss-free dinner, boneless chops cook faster and more predictably, while bone-in makes for a showier presentation.

Bone-in vs. boneless and their cooking implications

Bone-in chops are forgiving, because the bone moderates heat and helps maintain tenderness during cooking, so you can get a crisp exterior without overcooking the center. They typically need a few extra minutes, and that window is perfect for letting a glaze reduce and lacquer the surface. Boneless chops, by contrast, benefit from a quicker sear and a care for exact internal temperature; they often finish faster and are easier to slice for plating. Both types respond well to brining or a quick marinade, which helps even out moisture loss and seasons the meat through and through.

When planning time at the stove, remember that thickness trumps bone presence in determining cooking time. A thin bone-in chop might still cook faster than a very thick boneless chop. Use an instant-read thermometer as your ally; aim for about 140-145°F (60-63°C) pulled from heat to rest to reach a juicy medium. Resting under foil for five to eight minutes lets carryover heat finish the job and gives the glaze a moment to set into a glossy finish. With practice, you learn to judge doneness by touch and color, but the thermometer removes guesswork for consistent results.

Ingredients and equipment you’ll need

Maple Glazed Pork Chops. Ingredients and equipment you’ll need

Keeping the ingredient list focused will let the maple shine without unnecessary complication. At minimum you need quality pork chops, pure maple syrup, a fat for searing such as canola oil or clarified butter, salt and freshly ground pepper, and an acid to balance the sweetness—apple cider vinegar, lemon juice, or Dijon mustard all work well. From there, aromatics like garlic, shallot, or fresh herbs add depth; a splash of soy sauce or a spoon of butter brings umami and gloss. Salt is essential in every step: brine or dry-salt the meat to season it through and help retain moisture while cooking.

As for equipment, a heavy skillet is your best friend, preferably cast iron or stainless steel: these pans hold heat and produce the Maillard reaction that creates the browned crust. A small saucepan to reduce the glaze is useful when making the sauce separately, though you can also deglaze the pan after searing the chops and reduce the glaze right there. An instant-read thermometer is worth owning for any serious meat cookery. Finally, a small whisk or spoon for basting and a sheet tray for finishing in the oven make the sequence easy and reliable.

Ingredient Typical Amount
Pork chops (1–1.5 inch thick) 4 chops (about 1.5–2 lbs)
Pure maple syrup 1/3–1/2 cup
Dijon mustard or apple cider vinegar 1–2 tbsp
Butter or oil 1–2 tbsp
Garlic / shallot 1 clove or 1 small shallot, minced
Salt & pepper To taste

Step-by-step recipe: a reliable method

Begin by seasoning your chops at least 30 minutes ahead, or better yet, salt them an hour before cooking and leave them uncovered in the fridge to dry the surface. This dry time helps the exterior brown more efficiently. If you prefer brining, dissolve a tablespoon of salt in a cup of water with an optional tablespoon of sugar and submerge the chops for 20 to 45 minutes; then pat dry thoroughly before searing. Both approaches improve moisture retention, but dry salting adds a cleaner crust when searing.

Preheat your oven to 400°F (200°C) if you plan to finish the chops in the oven, and preheat the skillet on medium-high until it’s hot but not smoking. Add a tablespoon of oil and place the chops gently into the pan, leaving space so they sear rather than steam. Sear for about 3 to 4 minutes per side, depending on thickness, until a golden brown crust forms. If you are using bone-in chops, you may need an extra minute per side; resist the urge to move them too soon, as a good crust releases from the pan when ready.

Once both sides are browned, reduce heat to medium and add the aromatics—minced garlic or shallot—so they soften without burning. Pour in about half of the maple syrup, plus the acid component (a spoonful of Dijon or a splash of vinegar), and let the mixture come to a gentle simmer. Spoon the glaze over the chops repeatedly so it reduces and thickens, coating the meat; this process takes several minutes and develops the glossy lacquer you want. If you prefer oven-finishing, transfer the skillet to the oven for 6 to 8 minutes until the internal temperature reaches 140–145°F, then rest the chops for five minutes before serving.

Technique focus: how to make the glaze sing

A successful glaze is more about timing than complexity. Start with a modest amount of maple syrup and concentrate it by simmering with a balancing element like mustard, soy, or vinegar to avoid cloying sweetness. Butter swirled in at the end gives a satin finish, while a small dash of salt or soy sauce enhances savory depth. Keep an eye on heat; maple syrup can burn quickly, turning bitter and ruining the profile of the dish. If the stove is too hot, the sugars will scorch before they have time to caramelize properly.

Basting is a small technique that makes a big difference: use a spoon to continuously spoon the reducing glaze over the chops so the surface builds layers of flavor and color. This repeated glazing encourages an even sheen and helps the glaze cling to the meat rather than puddling on the plate. For an additional layer, finish with a final spoon of warm reduced syrup right before resting, then tent briefly with foil; this helps the glaze set and the juices redistribute. The result is a glossy, slightly sticky surface that gives way to a tender interior.

Variations and flavor twists

Maple pairs with a surprising range of accents; selecting one or two will transform the basic glaze into a distinct signature. Consider adding a splash of bourbon or dark rum for warmth and complexity—the alcohol evaporates, leaving behind caramel notes that mirror the maple. If you prefer an Asian-leaning twist, introduce soy sauce, rice vinegar, and a pinch of chili flakes to add umami and gentle heat. A simple mustard-Maple glaze with a tablespoon of Dijon and a teaspoon of whole grain mustard seeds adds a bright tang and pleasing texture.

Herbs and aromatics also offer easy upgrades: sage and thyme complement pork particularly well, while rosemary can be assertive but lovely when used sparingly. For a smoky element, incorporate a teaspoon of smoked paprika or briefly flame the chops on a grill to add char before finishing the glaze. Seasonal ideas work too—stir in a handful of cranberries during reduction for autumnal brightness, or top with a pear compote in winter for a fruit-forward plate. Each small change shifts the dish’s mood without complicating technique.

Side dishes and drinks that complete the plate

The goal with sides is contrast: think acidic or bitter elements and textural contrasts to balance the sweet, rich glaze. A crisp green salad with a lemon vinaigrette offers a bright counterpoint, while sautéed Brussels sprouts with bacon and a splash of vinegar echoes the pork’s savory notes. For starch, creamy mashed potatoes or a parsnip purée provide a neutral canvas that lets the glaze stand out, whereas roasted sweet potatoes amplify the sweetness in a controlled way. Grain options like farro or wild rice add chew and absorb any extra sauce beautifully.

Pairing beverages depends on the flavor direction you chose: for a maple-Dijon glaze, a medium-bodied white like oaked Chardonnay or a light red such as Pinot Noir works well. If you lean into Asian flavors with soy and chili, try a Gewürztraminer or a crisp lager to match the spice and aromatic intensity. Nonalcoholic pairings should focus on acidity; a sparkling water or apple cider provides lift and cuts through the glaze’s richness. Think about balance on the plate and in the glass so that each sip refreshes the palate.

Make ahead, storing, and reheating

You can prepare components in advance to reduce last-minute work: the glaze keeps well refrigerated for up to five days, and chops can be brined or dry-salted the day before. If you cook the chops ahead, cool them quickly, store them in an airtight container, and refrigerate up to three days for best quality. Reheating is best done gently to preserve moisture and the glaze’s texture; a low oven at 300°F covered with foil for 10–15 minutes works better than the microwave, which tends to make the glaze soggy and the meat rubbery. Add a little extra warmed glaze or a pat of butter to refresh the coating during reheating.

Freezing cooked pork chops is possible, though the glaze’s texture will change on thawing; wrap each chop tightly with cling film and then foil, or use vacuum sealing to minimize ice crystals. Thaw overnight in the refrigerator, then reheat slowly as described above, finishing with a fresh drizzle of warmed maple reduction. If you’ve frozen raw chops brined ahead, thaw and pat dry before searing to ensure proper browning. Thoughtful storage preserves quality and lets you enjoy this dish beyond the initial meal.

Troubleshooting common problems

Sticky, bitter, or runny glaze issues are common, and each has a simple fix. If the glaze becomes bitter, it likely burned; reduce heat immediately next time and allow the pan to cool a touch before adding the syrup. Runny glaze usually indicates insufficient reduction—simmer the sauce longer until it coats the back of a spoon, or finish with a small knob of cold butter to emulsify and thicken. If your chops are dry, they were overcooked; next time use a thermometer and pull at 140–145°F, then rest to reach final temperature without drying out.

  • If the surface caramelizes too quickly, lower the heat and baste more frequently to build color gradually.
  • For uneven browning, ensure the pan is hot when the meat goes in and avoid overcrowding the pan.
  • If the glaze won’t stick, pat the meat dry before searing and add the glaze during lower heat so it can adhere rather than run off.

Nutrition and dietary notes

Maple syrup is a natural sweetener, but it is still sugar and contributes calories; using a smaller quantity and pairing it with acid keeps the sweetness perceived as balanced. Pork chops offer a high-quality protein source and are rich in B vitamins and minerals such as zinc and selenium. Choosing leaner cuts or trimming excess fat reduces calorie density, while bone-in chops retain flavor and may require less added fat during cooking. For those monitoring sodium, reduce added salt and use low-sodium soy or avoid brining; the natural flavors in maple and aromatics will still carry the dish.

For dietary adaptations, the glaze principle translates well: swap maple for a reduced balsamic glaze for lower sugar content, or use a sugar substitute designed for cooking if needed, but be aware textural differences. Vegetarian or vegan alternatives can be built around thick seared tofu or tempeh glazed with the same reduction to create a similar sweet-savory profile. Whatever the need, aim to respect balance on the plate: protein, vegetable, and a controlled starch make for a satisfying meal that keeps the glaze as an accent rather than the whole story.

Bringing everything together: my favorite way to serve these chops

My go-to approach is simple and reliable: brine the chops briefly, sear them in a screaming hot cast-iron skillet, and finish by spooning a maple-Dijon glaze until glossy and slightly tacky. I serve them on a bed of creamy mashed potatoes, with roasted Brussels sprouts tossed with lemon and toasted almonds for crunch. A small drizzle of warmed glaze over the finished plate ties the elements together and invites that first, irresistible forkful. Guests often mention the balance—sweetness from the maple, a savory backbone from the meat, and a bright counterpoint from the veg—and that steady praise never gets old.

Cooking these chops teaches a few transferable lessons: prioritize good searing heat, manage sugar carefully to avoid burning, and balance sweet with acid and salt. Armed with those principles, you can experiment confidently—substitute pears or apples in the glaze, add a smoky accent, or switch the finish to a pan sauce with stock and butter. The technique stays the same, and the results are consistently rewarding: a dish that looks elegant, tastes layered, and feels approachable. Enjoy the process, listen to the sizzle, and let the maple do most of the talking when it matters.

Red Lentil Vegetable Soup: a Comforting, Bright, and Nourishing Bowl

There is something quietly persuasive about a steaming bowl of Red Lentil Vegetable Soup: it fills the kitchen with a smell that promises warmth and satiety, yet it manages to feel light and fresh. This dish balances simplicity and depth—red lentils give body and creaminess, while vegetables bring color, texture, and a spectrum of nutrients. Whether you are looking for an easy weeknight meal, a make-ahead lunch, or a recipe to soothe a tired soul, this soup is versatile enough to answer all those needs. In the lines that follow, I will walk you through why red lentils shine here, which ingredients matter most, how to adjust flavors for different diets, and practical tips I learned from many pots on the stove.

Why red lentils are such a good choice for soup

Red Lentil Vegetable Soup. Why red lentils are such a good choice for soup

Red lentils cook quickly and break down into a velvety texture, which means you do not need prolonged simmering to achieve a satisfying mouthfeel. Unlike some legumes, they do not require soaking, so the whole process shortens, perfect for busy evenings. Their natural sweetness and subtle earthiness pair remarkably well with both bright aromatics like lemon and cilantro and deeper flavors like smoked paprika or caramelized onions. Because they thicken soup as they break apart, you can create both brothy and creamy versions simply by adjusting the amount of liquid and the length of cooking. For anyone who appreciates a major flavor payoff for little effort, red lentils are a rare bargain.

Another practical benefit is their nutritional profile: red lentils offer a good dose of plant protein and fiber, which helps make the soup both filling and healthful. They absorb seasonings well, so a modest amount of spices translates into a pronounced flavor. In addition, red lentils are inexpensive, shelf-stable, and widely available, removing barriers to regular cooking. All these traits make them ideal for a vegetable-forward soup that aims to be both comforting and nourishing. I often think of them as the connective tissue in the bowl, bringing vegetables, broth, and spices together into one coherent experience.

Nutritional snapshot: what you get in one bowl

When you build a vegetable soup around red lentils, you end up with a balanced meal: complex carbohydrates, plant protein, fiber, vitamins, and minerals. This combination supports steady energy and keeps blood sugar more stable than a carbohydrate-only meal. Vegetables add micronutrients that are frequently underrepresented in everyday diets, such as vitamin A, vitamin C, folate, and potassium. The soup’s hydration factor and relatively low caloric density also make it a smart option for anyone trying to manage weight without sacrificing flavor.

Below is a simple table illustrating typical nutrients found in a generous serving of Red Lentil Vegetable Soup. Exact numbers will vary depending on ingredients and portion size, but the table gives a useful ballpark.

Nutrient Approximate amount per serving Why it matters
Calories 250–400 kcal Depends on oil and grain additions; keeps meal satisfying without excess.
Protein 12–18 g Red lentils are a strong plant-protein source, supporting muscle repair and satiety.
Fiber 8–12 g Promotes digestion and prolonged fullness.
Vitamin A 20–60% DV From carrots, sweet potatoes, or red peppers; supports vision and immunity.
Iron 15–30% DV Plant iron complemented by vitamin C from tomatoes or lemon improves absorption.

Essential ingredients and why each matters

Every successful Red Lentil Vegetable Soup has a handful of non-negotiable components that build depth and balance. Start with aromatics—onion, garlic, and celery or leek—to create a savory base. Carrots or sweet potatoes add sweetness and body, counterbalancing the lentils’ nuttiness. Tomatoes or a splash of vinegar bring acidity, elevating other flavors and preventing the soup from tasting flat. A good stock, whether vegetable or chicken, colors the overall profile and supplies umami. Finally, herbs and spices—cumin, coriander, turmeric, or smoked paprika—introduce personality without overwhelming the core ingredients.

Beyond the essentials, textures matter. A handful of greens stirred in near the end—kale, spinach, or Swiss chard—adds freshness and a pleasant chew. Fresh herbs at the finish provide lift: cilantro or parsley brightens; dill lends a delicate lift. If you want crunch, toasted seeds or croutons work well. Olive oil or a pat of butter enriches mouthfeel; coconut milk can add creaminess and a different flavor direction. Each ingredient plays a clear role, so when you compose the soup, think about balancing body, brightness, and finishing texture.

Classic Red Lentil Vegetable Soup recipe (detailed)

Below is a versatile, practical recipe that yields a satisfying pot for four to six people. I designed it so you can scale easily, swap vegetables, or adapt spices for different cuisines. The method emphasizes building flavor at each step and offers notes on timing to keep things simple. Prepare basic mise en place—chop vegetables, rinse lentils—before heating the pot; this makes the process calm and enjoyable.

Ingredients:

  • 1 cup red lentils, rinsed until water runs clear
  • 2 tablespoons olive oil
  • 1 medium onion, finely chopped
  • 2 carrots, diced
  • 2 stalks celery, diced
  • 2 cloves garlic, minced
  • 1 medium potato or 1 cup diced sweet potato (optional)
  • 1 can (14 oz) diced tomatoes, with juices
  • 6 cups vegetable or chicken stock
  • 1 teaspoon ground cumin
  • 1/2 teaspoon turmeric
  • 1/2 teaspoon smoked paprika or sweet paprika
  • Salt and black pepper to taste
  • 2 cups chopped kale or spinach
  • Juice of half a lemon or to taste
  • Chopped fresh herbs and yogurt or olive oil for serving

Method (step-by-step):

  1. Heat the olive oil in a heavy pot over medium heat. Add the onion, carrots, and celery and cook until the onion is translucent and vegetables begin to soften, about 6 to 8 minutes.
  2. Add garlic, cumin, turmeric, and paprika. Stir constantly for 30 to 60 seconds to release the spices’ aroma but avoid burning.
  3. Add the diced tomatoes and potato or sweet potato if using. Stir to combine and simmer for 2 to 3 minutes to mellow the tomatoes.
  4. Pour in the stock and bring to a simmer. Add the rinsed red lentils, reduce heat to maintain a gentle simmer, and cook uncovered for 15 to 20 minutes, stirring occasionally.
  5. When lentils are tender and beginning to dissolve, stir in the chopped greens and cook for another 3 to 5 minutes until they wilt. Taste and adjust salt and pepper.
  6. Finish with lemon juice and a drizzle of olive oil or a spoonful of yogurt for added richness. Serve hot with herbs and optional toppings.

Notes on timing and consistency

If you prefer a chunkier soup, reduce cooking time by a few minutes before adding the greens. For a creamer, almost bisque-like texture, simmer a bit longer and use an immersion blender to puree partially or entirely. Adding the lemon at the end brightens the whole pot and prevents the citrus from dulling during cooking. If you simmer too long and the soup becomes overly thick, simply thin with more stock or water until you reach the desired consistency. The flexibility of red lentils lets you pivot between textures without sacrificing flavor.

For meal prep, the soup keeps well in the fridge and often tastes better after a day as flavors meld. If freezing, leave it slightly less watery than you want when reheating; frozen soups can thicken because lentils continue to absorb liquid. Reheat gently on the stove and add a splash of stock or water to rejuvenate the consistency.

Flavor variations to explore

One of the joys of this soup is how easily it adopts different culinary traditions. For a Middle Eastern touch, add cinnamon, allspice, and a squeeze of pomegranate molasses at the end. For an Indian-inspired version, swap turmeric and cumin for garam masala and finish with cilantro and a dollop of yogurt. A Mediterranean route benefits from rosemary, lemon zest, and roasted red pepper. If you want smoky depth, stir in a small amount of chipotle or smoked paprika and roast the vegetables first to develop caramelization.

Experimenting with liquids also changes the character. Coconut milk turns the soup into a richer, slightly sweeter dish that pairs beautifully with ginger and lime. Using a miso-enriched broth adds umami and subtle fermentation notes, great with mushrooms and bok choy. Changing the garnish—crunchy fried shallots, toasted pine nuts, preserved lemon—lets each serving tell a different story while the base recipe remains familiar and dependable.

Common mistakes and how to avoid them

A few predictable missteps can flatten an otherwise great soup. Under-seasoning is perhaps the most frequent: because lentils thicken and absorb flavors, you may need more salt or acidity than anticipated. Taste midway and again at the end, adjusting salt, pepper, and acid. Another pitfall is rushing the sauté stage. Properly softening the aromatics develops sweetness and depth that cannot be replicated later. Also avoid adding delicate greens too early; they should be folded in near the end to preserve color and texture.

Finally, watch the heat. A rolling boil breaks down lentils unevenly and can lead to sticking on the pot’s bottom. Keep a gentle simmer. If you want a silkier texture, purée part of the soup rather than the entire pot, retaining some vegetable chunks for interest. These small habits—seasoning boldly, sautéing thoroughly, and controlling heat—prevent common derailments and make the cooking process smoother and more rewarding.

What to serve with the soup

This soup functions well as either a main or a starter. Paired with a slice of crusty bread or warm flatbread, it becomes a satisfying main course. A simple grain salad—quinoa, bulgur, or freekeh tossed with lemon and herbs—adds chew and variety for a fuller meal. Serve with a crisp green salad dressed in a light vinaigrette for contrasting textures and a burst of freshness. For a heartier plate, top the soup with roasted chickpeas, crumbled feta, or a soft-boiled egg.

Beverage pairings are straightforward. A light-bodied red or an aromatic white works if you want wine. Non-alcoholic options such as sparkling water with lemon or a cool cucumber-yogurt drink make the meal feel fresh and balanced. Think in terms of contrasts: creamy soup meets something bright and acidic to cut through the richness, or something crunchy to add texture.

Storage, reheating, and meal-prep tips

Red Lentil Vegetable Soup refrigerates well for three to four days. Cool the pot to room temperature quickly, then store in airtight containers. If you plan to freeze, portion into single-serving containers for easy thawing; frozen soup keeps for two to three months. When reheating, do so slowly over low heat, stirring occasionally and adding a splash of broth or water to restore the texture. Avoid boiling the soup hard while reheating to preserve the integrity of any added greens or yogurt finishes.

For meal prep, multiply the recipe to create lunches for the week. Pack garnishes separately to keep them fresh and prevent sogginess. If you like a creamier finish, reserve a little coconut milk or yogurt in the fridge and swirl it in just before serving. I often make a double batch on Sundays: one portion goes to the freezer and the rest carries me through busy weekday lunches that feel anything but routine.

Dietary adaptations and substitutions

The soup is naturally vegetarian and easily vegan if you choose a vegetable stock and omit dairy garnishes. For gluten-free needs, ensure any bread served alongside is certified gluten-free and avoid adding bulgur or other wheat-based grains. To increase protein beyond lentils, stir in cooked quinoa, shredded chicken, or cubed tofu depending on dietary preference. For low FODMAP versions, reduce onion and garlic and use chives and garlic-infused oil for flavor without FODMAPs.

Those watching sodium should use low-sodium broth and be judicious with salt, tasting and adding in increments. For a lower-fat variant, reduce the oil at the start and finish with a small drizzle of high-quality extra virgin olive oil for mouthfeel. The recipe’s core is adaptable without losing the appeal that makes it such a comforting, healthy choice.

Personal notes from the kitchen

I learned the power of small adjustments through many dinners where guests praised a soup that I thought was only okay. One winter evening, after caramelizing onions for longer than usual and finishing with a handful of chopped parsley and a lemon squeeze, I realized those final steps turned a good recipe into something memorable. Another habit I recommend: toast your spices briefly in the pot before adding liquids. That small step unlocks aroma and color, and it is a technique I now use for nearly all my soups. These moments taught me that tiny, deliberate choices matter more than fancy ingredients.

Over the years, I have seen this soup travel to potlucks, feed sick friends, and become a cherished weeknight staple. Once, I brought a thermos to a long train ride and found that the soup’s warmth and bright lemon note made the whole trip feel less tiring. It is the kind of recipe that rewards repetition: each time you make it, you discover a new nuance—perhaps a spice ratio that better suits your palate or a vegetable swap that makes it sing.

Frequently asked questions

Can I use other lentils instead of red lentils?

Red lentils are unique in how quickly they break down, so using green or brown lentils will yield a chunkier, firmer texture and require longer cooking. If you substitute, increase simmer time and consider partially pureeing the soup if you still want creaminess. Keep an eye on liquid ratios as different lentils absorb water differently.

Is this soup suitable for freezing?

Yes, it freezes well. To prevent textural changes, cool the soup completely before freezing, and leave a little extra liquid when packing. Thaw overnight in the refrigerator and reheat gently, adding a splash of stock if the texture is too thick.

How can I make the soup more filling for meal prep?

Add cooked whole grains like farro, barley, or quinoa at serving time or fold in roasted root vegetables for additional calories and texture. Toppings like roasted chickpeas, a spoonful of tahini, or a side of flatbread turn the bowl into a more substantial meal.

Final thoughts and encouragement

Red Lentil Vegetable Soup is one of those dishes that rewards curiosity and simplicity at once. It is forgiving yet precise when you care to be, nourishing but never dull. Whether you aim to eat more plant-based meals, need a dependable recipe for weeknight dinners, or want a flexible base for creative experiments, this soup delivers. Make it your own: adjust spices, swap vegetables in season, and treat garnishes as opportunities rather than afterthoughts. The result will be a bowl that comforts, satisfies, and keeps you coming back for more.

If you try this recipe, notice which small adjustments make it yours—a different herb, a finishing acid, or an unexpected spice. Those personal touches are what turn a well-made soup into a signature one, the kind you remember and pass along. Enjoy the process as much as the bowl; the act of cooking this soup is as restorative as the eating.

Smoke, Sauce and Sizzle: Mastering the Art of BBQ Chicken

There’s something evocative about the smell of caramelizing sauce and smoke winding through a backyard on a warm evening. This article is a deep, practical dive into making outstanding BBQ chicken that’s juicy, smoky and layered with flavor. I’ll walk through ingredients, techniques for both outdoor grills and the oven, my favorite marinades, sauce ideas, and the little tricks that keep meat tender and the skin crisp. Expect recipes, timing tables, tool lists and a few personal notes from years of grilling on everything from a portable gas grill to a full-size ceramic smoker. Read on and you’ll come away with a clear plan for your next cookout, whether you’re feeding two or a crowd.

The story behind BBQ chicken: cultures, methods and why it endures

BBQ chicken is more than a recipe; it’s a set of traditions that vary by region, backyard and family. In the American South, slow-smoked whole birds or bone-in pieces get slathered with vinegar-based sauces or molasses-rich glazes. On the West Coast, you’ll find sweet, tomato-forward sauces and charcoal-grilled halves with crisp edges. Each approach reflects local ingredients, fuel types and the social purpose of the meal—feasting, celebration or simply a weeknight dinner turned special.

Beyond geography, the appeal of BBQ is tactile: the contrast between tender meat and crisp, sticky bark, the savory-sweet interplay of smoke and sugar, and the ritual of tending coals. For home cooks, mastering BBQ chicken means learning heat control, timing for different cuts, and how to layer flavor with brines, rubs and sauces. That craft is accessible; you don’t need a pro smoker to make memorable chicken, just a plan and a few technique notes that we’ll cover in detail.

Choosing the right cut for your cook

BBQ Chicken. Choosing the right cut for your cook

Chicken comes in many shapes and each cut behaves differently on heat. Thighs and drumsticks tolerate higher, longer heat and forgiving cooking, which helps preserve juiciness. Breasts cook quickly and can dry out unless handled carefully, so they’re better when brined, butterflied, or cooked indirectly with a finishing sear. Whole birds are impressive on the table but need attention to ensure even cooking from thigh to breast.

Think about your audience and timing: bone-in pieces are ideal for casual gatherings where people pick and eat, while boneless cuts suit sandwiches and quick midweek meals. When feeding a crowd, combining a few thighs and whole legs with a spatchcocked breast gives visual appeal and consistent results. I often default to bone-in thighs for reliability; they’re my “go-to” when I want something I can set and forget for a while.

Brines, marinades and rubs: how to layer flavor

Flavor starts deep, not only on the surface. Brining adds moisture and seasons the protein throughout; a simple wet brine of water, kosher salt and sugar for two to four hours makes an appreciable difference for breasts and whole birds. Marinades introduce acidity and aromatics—citrus, yogurt or vinegar-based mixes are common—but avoid long acidic marinades for skin-on pieces, which can break down texture and lead to a mushy surface. Dry rubs deliver flavor concentration, forming a seasoned crust when combined with heat and smoke.

Use combinations that complement your sauce rather than clash. For example, if you plan a sweet, molasses-rich glaze, build your rub around smoked paprika, brown sugar and black pepper. If you aim for a tangy, vinegar-style finish, lean into garlic powder, chili flakes and celery seed. Time matters: brine for a few hours, marinate up to overnight for robust flavors, and apply dry rub right before cooking for the best bark development.

Simple dry rub recipe and options

Here’s a flexible rub that works on thighs, drumsticks and whole birds: 2 parts smoked paprika, 1 part brown sugar, 1 part kosher salt, 1 part black pepper, 1/2 part garlic powder, 1/2 part onion powder, and a pinch of cayenne. Adjust the sugar up or down depending on whether you plan to finish with a sweet sauce. This blend forms a caramelized, flavorful crust and plays nicely with most BBQ sauces.

Variations are easy: swap smoked paprika for regular paprika plus a touch of liquid smoke for a different smoky profile, or add ground cumin and coriander for a slightly earthy, Latin-inspired rub. For lighter, fresher flavors, consider a lemon-pepper twist with lemon zest and cracked black pepper in place of brown sugar. The idea is to balance salt, heat and sweetness so the chicken’s flavor remains central.

Sauces and glazes: regional styles and finishing techniques

Sauces are the emotional headline of any BBQ plate; they can define a whole meal. Broadly, sauces fall into categories: tomato-based and sweet, mustard and tangy, vinegar and sharp, and fruity or spicy hybrids. A classic Kansas City-style sauce is thick, sweet and tomato-forward, while Carolina sauces trend vinegar-based with a lighter hand on sugar. Choose a sauce that complements your rub and method: thick sauces can burn over direct heat, so apply them near the end of the cook.

Glazing is an art: brush on thin coats in the final 10–15 minutes of cooking, allowing sugars to set but not char to bitterness. For a sticky, lacquered finish, apply several light layers and hold the bird over indirect heat so the glaze cooks through without blistering too much. If you want a smoky, charred edge along with glaze, finish briefly over hot coals or a high flame, watching carefully so it doesn’t burn.

Grilling techniques: direct sear and indirect roast

Control of heat is the most important skill on a grill. Direct heat is excellent for skin crisping and quick searing, ideal for wings, thin breasts or finishing sauce. Indirect heat mimics an oven and is better for larger, bone-in pieces that need gentler, slower cooking to reach safe internal temperature without drying. A two-zone setup—coals or burners on one side and a cooler zone on the other—gives you both on demand.

For a typical bone-in thigh: start over high heat for a short sear to render fat and color the skin, then move to indirect heat to finish cooking through. For breasts, consider two-pass cooking: cook indirectly until just under target temperature, then sear quickly to crisp skin and develop color. Watching the meat and using a probe thermometer is far more reliable than relying on time alone.

Charcoal vs. gas vs. pellet: what should you use?

Each fuel has its champions. Charcoal offers that classic, variable heat and a depth of smoke that’s hard to replicate; it’s my preference when I want a traditional, smoky profile and I have time to tend the fire. Gas is convenient, predictable and perfect for weekday cooks; it heats fast and maintains steady temps with minimal fuss. Pellet grills combine ease with smoke—adding wood pellets produces a consistent smoky flavor and precise temperatures, making them attractive hybrid options.

Choose based on your priorities: if you crave deep smoke and ritual, use charcoal or wood. If convenience and temperature control matter more, gas or pellet is sensible. Regardless of fuel, learning to read your grill—where the hot and cool spots are, how vents affect temperature—will raise the quality of every cook.

Smoking low and slow for maximum depth

Smoking chicken at low temperatures—225–275°F—infuses real smoke flavor across several hours. That technique is most commonly used for whole birds or when you want a pronounced smoky bark. Use mild hardwoods such as apple, cherry or maple for a gentle sweetness, or hickory and oak for a bolder note. Keep smoke thin and blue; heavy white smoke tends to impart bitter, sooty flavors.

Maintain consistent temperature and moisture: use a water pan if your smoker runs dry, and avoid opening the lid too often. For a smoky but juicy result, aim to remove chicken at 160–162°F for dark meat and 155–160°F for breasts, allowing carryover to bring it to safe eating temperature. That method ensures tender meat and a smoke ring that signals proper low-and-slow cooking.

Using the oven when outdoor grilling isn’t possible

Indoor cooking with an oven can produce excellent BBQ-style chicken when you can’t grill. Roast or bake at moderate temperatures—typically 375–425°F—using a convection setting if available to encourage browning. Brine first for juiciness, apply a rub, and place on a wire rack over a sheet pan to allow air circulation and crisp skin. Finishing under a preheated broiler for a few minutes can mimic the char you’d get outside.

Oven roasting pairs well with sauce glazing: brush on sauce in the last 10 minutes and broil briefly to caramelize. For a near-smoky flavor, add a teaspoon of liquid smoke to your marinade or use smoked salt in the rub, but use these sparingly to avoid artificial intensity. Rotisserie attachments for conventional ovens or countertop rotisseries can also give whole birds a beautiful, evenly browned finish with juicy interiors.

Temperature targets and a handy reference table

Food safety and doneness are best judged by internal temperature, not time. Chicken should reach at least 165°F in the thickest part for safety, but dark meat benefits from slightly higher pull temperatures for tenderness. Probe thermometers are indispensable tools; a good instant-read or leave-in probe removes guesswork and prevents overcooking.

Cut Target Internal Temp (Remove) Carryover Temp Typical Cook Method
Boneless breast 155–160°F to 160–165°F Indirect grill/oven, finish sear
Bone-in thigh/leg 160–165°F to 170–175°F Indirect heat, low-and-slow or direct+indirect
Whole chicken 160–165°F (breast), 170°F (thigh) rest to even out Roast, rotisserie or smoker

Use the table as a starting point and calibrate based on your equipment. Remember that a little carryover is fine and resting the meat redistributes juices for a more satisfying bite.

Finishing touches: glazing, charring and balancing flavors

The final stage is where texture and visual appeal come together. Apply glaze in thin layers so sugars can set rather than runoff; too much at once causes sticky puddles that may not cook through. For a caramelized finish, alternate between indirect heat and brief direct searing, watching the surface closely to prevent burning. A bright finish—sprinkled herbs, lemon zest or a splash of vinegar—balances rich, sweet sauces and lifts the dish.

Consider mouthfeel when pairing: a thick, molasses-based glaze calls for acidic or fresh sides to cut richness, while a vinegar-forward sauce pairs well with starchy, creamy elements. Small additions like finishing salt or a drizzle of oil can heighten flavor without overwhelming the bird. These micro-steps separate good BBQ from great BBQ.

Essential tools and a compact checklist

Simple tools make consistent results easier. I always have a probe thermometer, sturdy tongs, a basting brush, a chimney starter for charcoal, and heat-resistant gloves. A small spray bottle with apple juice or vinegar helps maintain moisture on the smoker, and a wire rack for oven roasts encourages even crisping. Investing in a reliable thermometer is the single best purchase for improving outcomes.

  • Probe thermometer (instant-read and/or leave-in)
  • Long-handled tongs and spatula
  • Chimney starter or reliable ignition for charcoal
  • Basting brush and small pan for glaze
  • Wire rack and sheet pan for oven work

These items are affordable and immediately useful whether you’re outdoors or using an oven. They speed up workflow and reduce mistakes under heat and smoke.

Pairings, sides and drinks that complete the plate

BBQ chicken shines most when matched with sides that echo or contrast its flavors. Creamy coleslaw provides cooling acidity and crunch, cornbread or grilled corn offers sweetness and char, and pickled vegetables cut through richness with bright vinegar notes. Beans—baked, stewed or simple—bring heft and comfort, while a crisp green salad adds a refreshing counterpoint on hot days.

For drinks, lighter beers and fruity wines work well with sweeter, tomato-based sauces, while dry Riesling or sparkling wines complement spicier, vinegar-forward profiles. Nonalcoholic pairings like iced tea with lemon, ginger beer, or sparkling water with cucumber create a relaxed, backyard-friendly vibe. Think balance: the goal is to complement, not clash.

Portioning, serving and presentation tips

Serving matters in how people experience the meal. Carve whole birds into manageable pieces or serve bone-in portions already sauced and arranged on large platters for sharing. For sandwiches, shred or slice warm chicken and toss it lightly with sauce to avoid soggy bread. Garnishes—fresh herbs, sliced scallions or a sprinkle of toasted sesame seeds—add color and aroma without much effort.

When hosting, keep a small station for extras: extra sauce warmed in a small pan, a bowl of wedges or rolls, and napkins for sticky fingers. If you expect leftovers, label containers with date and suggested reheating instructions so guests take home food that’s still excellent. Presentation that anticipates how people will eat makes the meal feel effortless.

Leftovers and creative reuse

Leftover BBQ chicken can be more valuable than the original cook when reimagined. Shred and use in tacos, toss into salads, fold into quesadillas or transform into protein-packed fried rice. The key is to warm gently and add moisture if necessary—sauces, broths or a quick sauté with onions and peppers restore juiciness. I often make double the amount of thighs because repurposed chicken extends into several meals with minimal effort.

For storage, cool meat quickly and refrigerate within two hours. Consume within three to four days or freeze for longer storage. When reheating, use a low oven or covered skillet to avoid drying; add a splash of stock or a brush of sauce to revive texture and flavor. Smart reuse reduces waste and multiplies the value of a single cook.

Common problems and how to fix them

Every cook runs into issues: burnt sugar, dry breasts, pale skin, or under-seasoned meat. Burnt sauce usually means heat was too high when sugars were applied—reduce direct heat and finish with a cooler approach. Dry breasts respond well to brining or brining then finishing with a sear to lock juices. Pale skin often indicates insufficient initial heat; a brief blast of high heat or broiler finish can remedy that.

Under-seasoning is easy to avoid: season throughout the process—brine, rub and sauce—and taste components beforehand. If smoke flavor is too faint, incorporate a smoke element in the glaze or use smoked ingredients. Troubleshooting gets easier with each cook; keep notes on what worked and what didn’t so your next attempt improves incrementally.

Personal notes: lessons from backyard cooks and late-night experiments

Over years of grilling, I learned small habits that changed outcomes. I trust my tools: a good thermometer and a simple log of times and temps saved countless birds. I also learned the value of restraint with sugar-heavy sauces early in the cook; saving those glazes for the final minutes preserves depth without burning. One memorable experiment was smoking chicken with applewood chips, then finishing with a maple-bourbon glaze—the balance was unexpectedly perfect for a chilly evening meal.

Another lesson: simplicity often wins. A well-seasoned thigh, charred just right and finished with a squeeze of lemon and flaky salt can outshine elaborate constructs. These are the kinds of discoveries that come from practice: start with dependable techniques, experiment deliberately, and keep the flavors balanced rather than stacked on top of one another.

Ready to fire up the grill

Now that you have a roadmap—cuts, brines, rubs, sauces, methods for grill and oven, plus troubleshooting tips—you’re positioned to choose a style and execute it confidently. Pick a cut, decide on a fuel source, and plan timing around the people you’re feeding rather than the clock. With tools in hand and a clear temperature target, the path to excellent BBQ chicken becomes repeatable.

Cook with attention and enjoy the process: tending heat, brushing on glaze, timing rests. These moments make BBQ more than food; they create memories. When you taste the first bite—smoky, juicy, and perfectly seasoned—you’ll see why so many of us keep returning to the grill.